What’s the best way to select a sky (or any other area, for that matter)? Sometimes selecting an area to work on is simple but more often it is not. The best selection method depends on the problems presented by the area.
Read Fixing a Washed-Out Sky
Some simple options are:
- The Lasso tool. This is best for crude selections where the edges will later be masked or erased.
- The Magic Lasso tool. It looks powerful but has limitations in finding subtle edges. If you zoom in for a close look you will see the edges are often not where you want them.
- Select > Color Range. Useful for an area of unique color.
- The Magic Wand tool which has been in Photoshop for a long time, and the related Quick Selection tool in Adobe Photoshop CS3. For an area such as a relatively featureless sky with a simple horizon line this can be a good method. You can choose a tolerance value, you can use the Shift and Alt keys to add or subtract areas, and you can choose to select contiguous or non-contiguous areas.
- Contrast masks. The best method for selecting on the basis of tonal differences, such as the darkest or lightest tones in an image.
- Painting the selection directly in Quick Mask mode. This is extremely flexible for areas with soft edges and I use it on almost every image for the digital equivalent of darkroom dodging and burning. I discussed it in my tutorial, Virtual Fill Flash and I’ll use it here to get a selection which I will refine with a variety of techniques.
I’m using Adobe Photoshop CS2 and I’m speaking Windows. If you use a Mac, substitute Cmd for Ctrl and Option for Alt.
After an initial selection is made, it almost always needs to be refined. It may be necessary to enlarge or contract the area, to feather its edges, to realign some parts of the edge or to change the strength of the adjustment in part of the mask by making it partially opaque.
Often you can’t see if the selected area needs refinement until you have made the adjustment the selection delineates. So you need to use a technique that lets you refine the selection after the adjustment is made. If you use the selection to make an adjustment directly on a pixel layer (darkening a sky with Image > Adjustments > Levels, for instance) you can’t refine the selection. You can go back and re-do it with a different selection but you have to guess at the necessary modifications. But if you make an approximate initial selection and then make an adjustment layer with that selection active, it will be incorporated into the adjustment layer as a mask and you can refine it two minutes or two years later.
Furthermore, you can see the effect directly on the image as you refine it, you can view the mask overlaid on the image, or you can view the mask by itself in black and white to touch up flaws. This is very powerful.
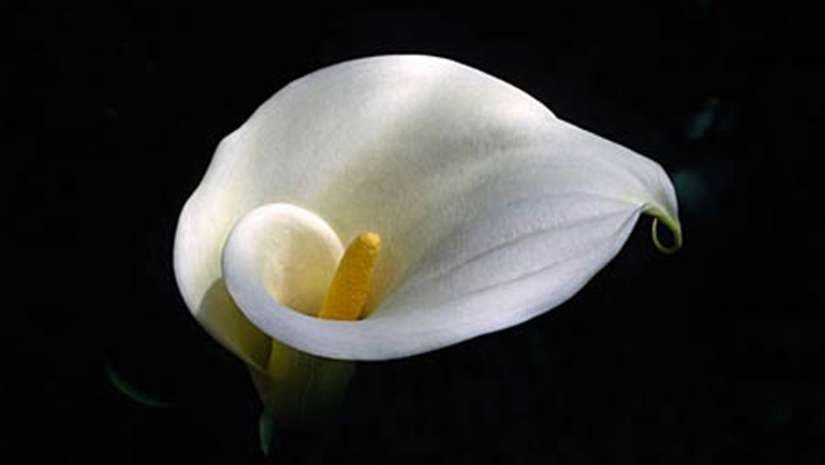
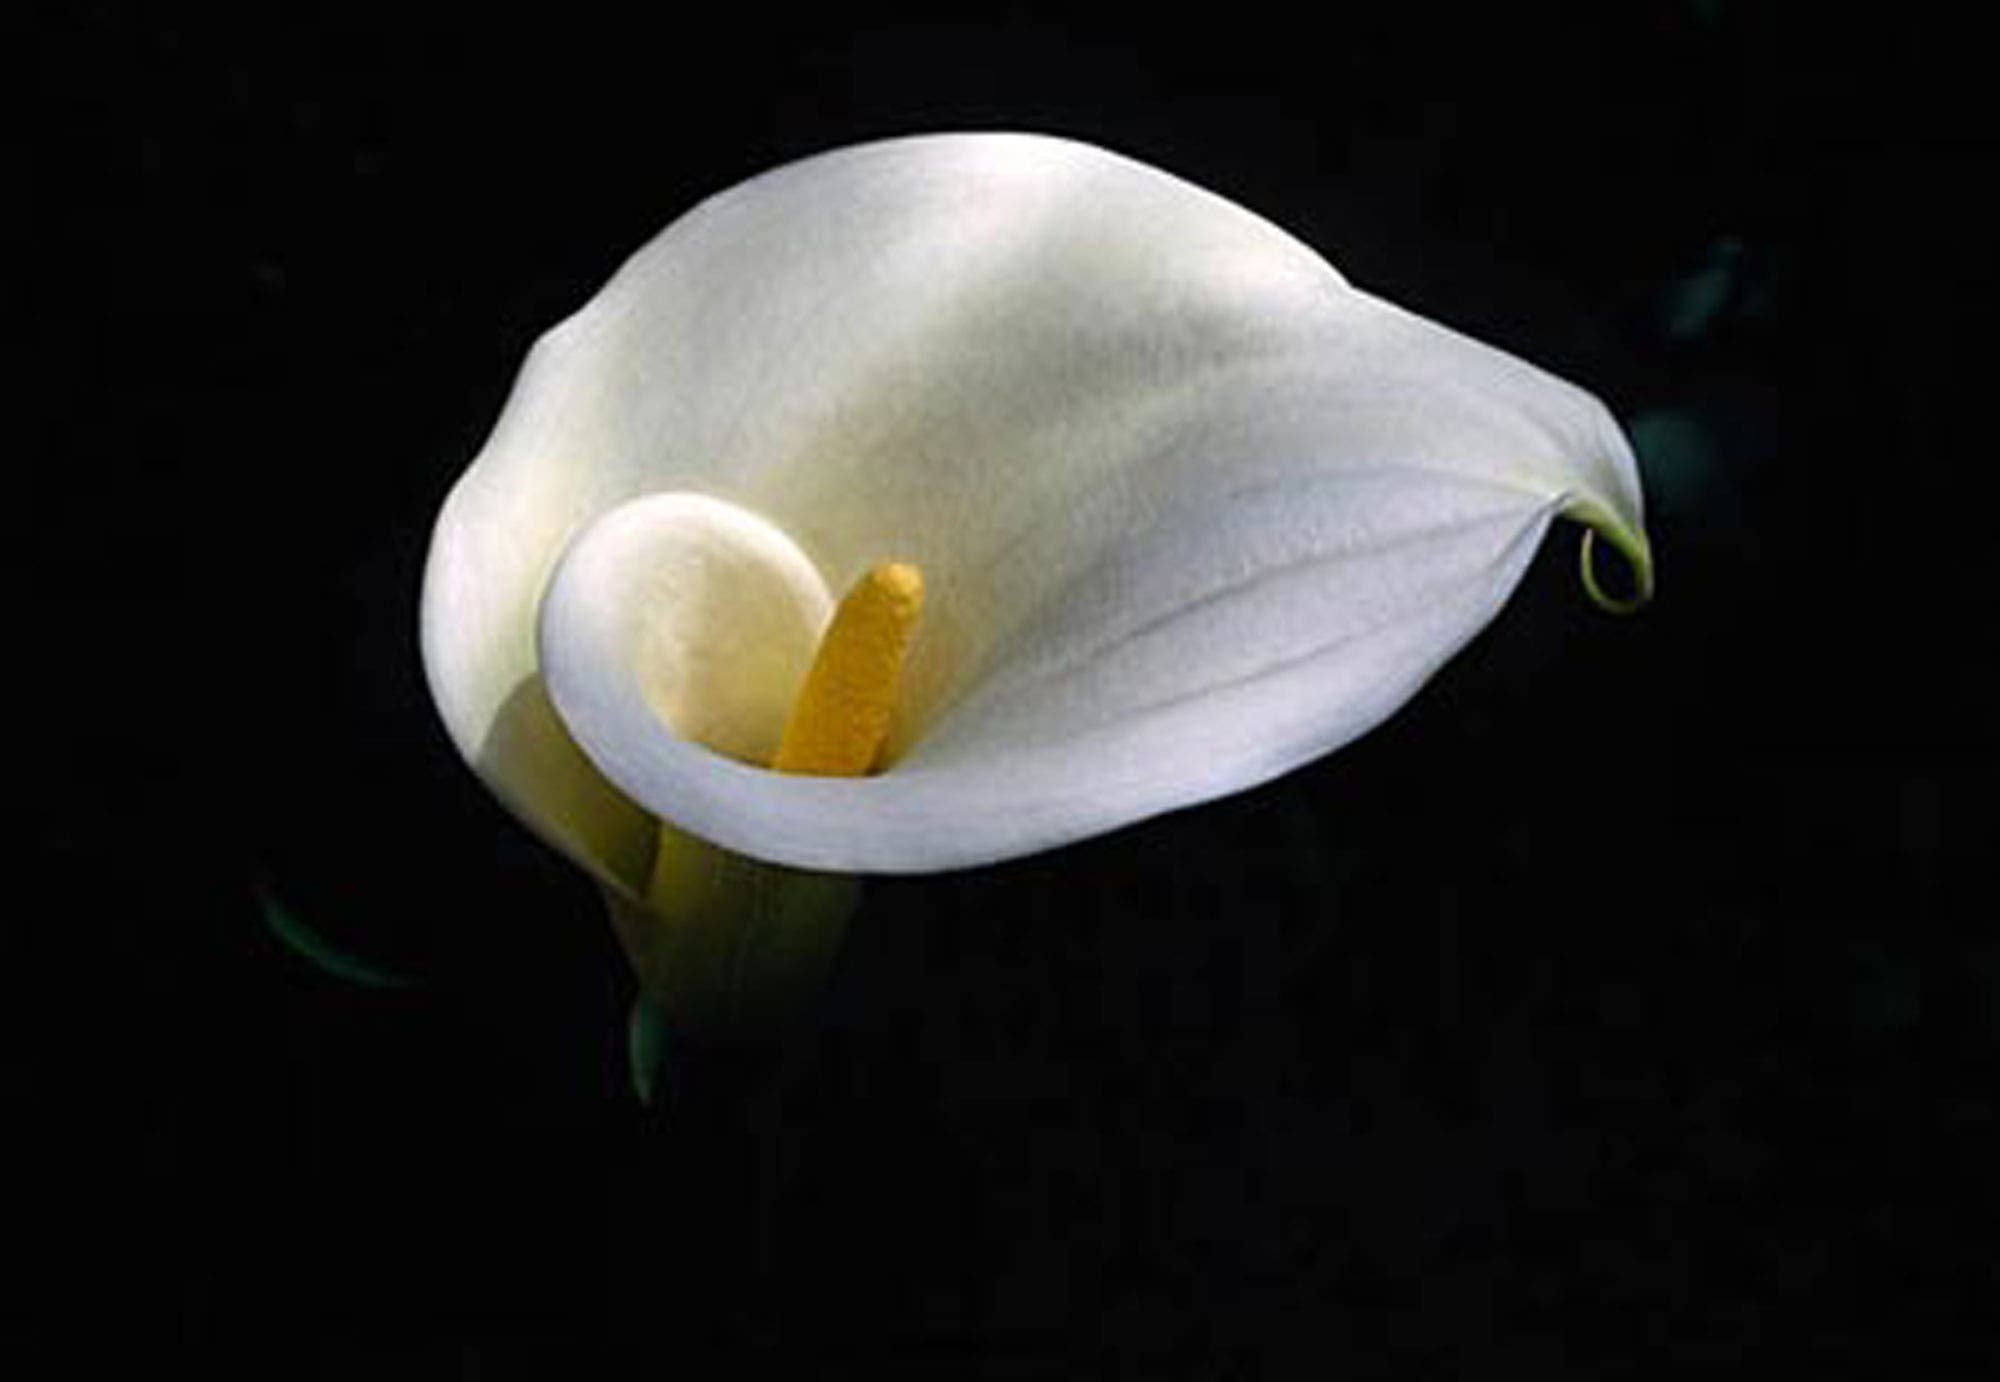
Here’s an image in which I wanted to lighten the shadow on the throat of the flower.

This is a difficult area to select so I resorted to my method of painting the selection in Quick Mask mode, the last method on my list above. I hit the Q key to get intoQuick Mask mode. Then I chose a brush of the right size and hardness (see below for more information on brush choices) and painted in the area I wanted to adjust. See the “Virtual Fill Flash” tutorial cited above for more information.
By default I will be painting in 50 percent opaque red. If red is not a good color (say you are working on a red rose) you can double-click the Quick Mask icon at the bottom of the Tool palette and change the color and opacity of the mask. You can also choose to have the area you paint be the selected area instead of the protected area (the default), which is usually easier because you often want to select a small area.
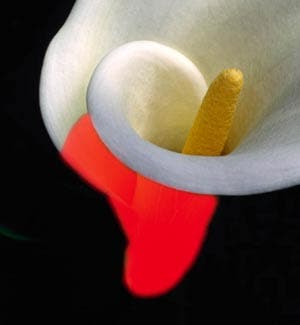
Here’s what I painted:
You can see the edges are somewhat soft. You can also see I didn’t try for perfection when painting because I can refine the edges better after making the lightening adjustment.
I came out of Quick Mask mode by hitting the Q key and the painted area becomes a selection. If I hadn’t changed the default to the painted areas being the selected ones, I would have to inverse the selection at this point. Then I made a Levels adjustment layer (Layer > New Adjustment Layer) and because there is a selection on the image, it will automatically be incorporated as a mask to the Levels adjustment. Then I made this simple move on the RGB channel, pulling in the right hand slider to the edge of the histogram’s information.
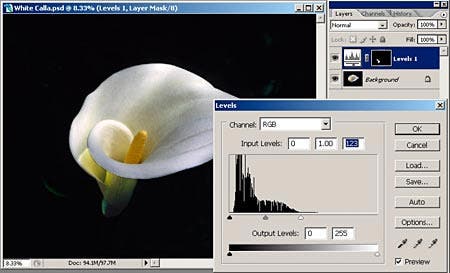
I liked the dramatic yellow color, so I decided to leave the adjustment at that, at least for now. If I wanted to change the color I could go back into this adjustment any time and go to the individual color channels in the Channel dropdown box above the histogram and use the middle sliders to modify the color. For example, in the Red channel, moving the middle slider left adds red and moving it right adds red’s complement, cyan. The Green channel lets you add green or magenta, and the Blue channel lets you add blue or yellow.
But back to the subject. I can now zoom in and see I need to make tweaks to the edges of the mask.

But first let’s look at the mask in more detail. I can do that in the Channels palette. Note the layout of my palettes in the above figure: Layers, Channels and History are together because I use these three all the time. Above them, in the upper right corner of the screen, I have the Information and Histogram palettes, grouped together. The rest, rarely used, are banished from my workspace. I can get them back by going to Window on the top menu bar. In addition, I have saved my workspace layout (Window > Workspace > Save Workspace) so I can get it back if something trashes it.
Before I start fixing the edges of the mask let’s look for flaws in the middle. Making sure the masked layer is the active (highlighted) one, I go to the Channels palette and the mask will be shown below the R, G and B channels. I only need to turn on its visibility and it appears as the opposite of what I drew in Quick Mask. It is opposite because red (or whatever color you have chosen) is showing the areas protected from your adjustment, and when I drew the mask I painted in the area I wanted not masked, as that involved painting a smaller area.
Caution: If the mask is not shown with a good color and opacity for the particular image, double-click the thumbnail representation of the mask, shown below the Blue channel in the Channels palette, and you can change the mask’s appearance. It doesn’t have to be the same as the settings in Quick Mask mode. When viewing the mask it looks like you are in Quick Mask mode but you are not.
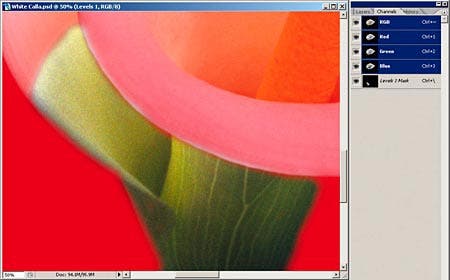
I think I can see some places where there is a bit of red in the area that should be clear. To be sure, let’s have a closer look at the mask. All I need to do is turn off the visibility of the top RGB channel and the mask is shown in black and white and I can see the flaws. (You can also Alt-click on the mask thumbnail in the Layers palette to get this view, and do the same to toggle back out.)
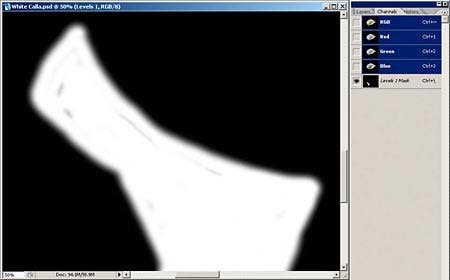
First I’ll take a white brush (the Foreground color at the bottom of the Tool palette set to white) of the appropriate size and softness and paint over the areas I missed.
There are three things I can change about the brush: size, hardness and opacity. Size is obvious. Let’s start with a 100 percent opaque brush. Hardness determines the profile of the spot the brush makes. A 100 percent hard brush makes a hard-edged circle, which is 100 percent opaque everywhere. A 0 percent hard brush is 100 percent opaque only in the center, tapering to zero at the edges, as shown in the center below. A 50 percent hard brush has the profile shown on the right:

If we lower the opacity of the brush to, say, 50 percent we get the following for the same three brushes:
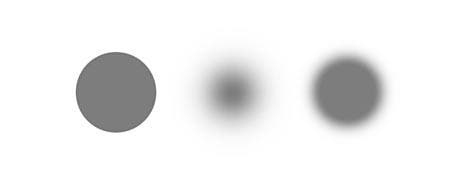
Combinations of these brush choices give me infinite flexibility in painting and tweaking a mask.
When I have the flaws cleaned up I’ll turn the RGB channel back on and go back to the Layers palette to work on the mask in the red overlay mode. Again I’ll use a brush to touch up the edges to a better fit. A black brush paints red and a white one erases red. I need to match the softness of the edges of the mask to the softness of the edges in the image or the adjustment will look artificial.
The power of fine-tuning
When I’ve done what I can with the edges, I’ll go back to the Channels palette and turn off the mask’s visibility. Now I can really fine-tune the mask while I see the effects directly on the image. I just have to remember whether to use a black or white brush. Black blocks the effect of the adjustment and white lets it through. At first, trial and error is a good method. You can tell if you have the wrong brush.
I’ll go back to the Layers palette and make sure the adjustment layer is the active one, and that the mask thumbnail is outlined in white (see the red circle in the figure below), which indicates the mask will be what I am drawing on. If you don’t get the behavior you expect make sure you aren’t drawing on the Background pixel layer or on another adjustment or pixel layer.
Here my brush is carefully tracing along an edge to refine the selection. I will need to go back and forth between a white brush on the inside edge of the area and a black brush on the outside. You can switch back and forth between the two brush “colors” using the X key. I may need to go to a 50 percent brush for subtle edges. I have adjusted the size of the brush to give the feathered softness I want to the edge.

Working in this view of the image itself gives you the opportunity to adjust areas that need to be reduced to partial opacity in order to allow a partial-strength adjustment. For instance, the adjustment is a bit too strong on the upper left edge and I need to feather it. I can do this by using a large soft brush to get a gradient effect. (But first I repaired the too-dark areas along the top half of that edge, continuing the work shown in the figure above.)
Here I am using a soft (0 percent hardness) and 10 percent opacity brush to soften the edge of the mask.
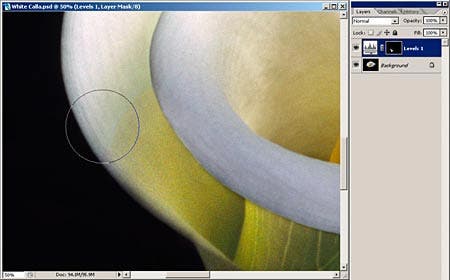
There is a bit more tweaking to be done but this is quite an improvement over the starting mask, shown again below:

Now I would like to open up a partial opacity area to add some brightness to the spadix (which is actually the flower.) I probably want about 50 percent, but if I use a 50 percent white brush I have to paint the area in one stroke. Otherwise, where I overlap strokes I will have erased more than 50 percent of the blocked-off area. So I will paint with a 100 percent opacity white brush until I have the area outlined as I want it. That allows me to overlap brush strokes as much as I need. Then I will go to a larger, hard, 50 percent opacity black brush and paint over that newly opened-up area in one stroke, being careful not to get into any other areas. If blocking off 50 percent of the adjustment isn’t the right opacity, I can back out with Ctrl-Z and try another value for the brush.
Here is the spadix at 100 percent opened to the adjustment:
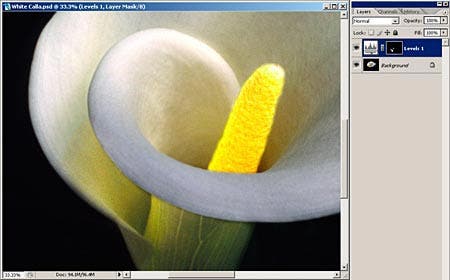
And here it is being partially blocked off with a 30 percent opacity hard brush:
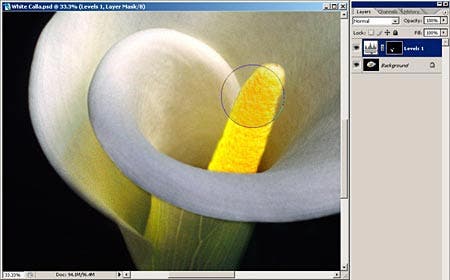
I could then go to a soft brush to further sculpt the edges for a more 3D look, if I wished. Since the white leaf-that-looks-like-a-flower area is fully masked I can draw over it with a black brush without changing it, as you can see below.
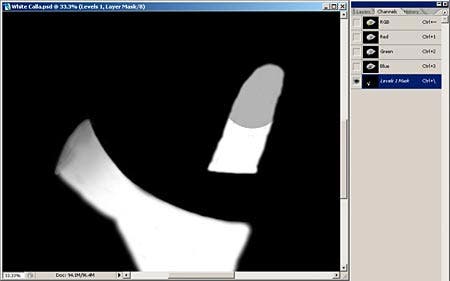
If I need to do some smoothing-out work in the gradient area on the left, it would be very difficult to get a good result painting with partial opacity brushes, but I can get a perfect result by using the Clone Stamp tool.
It isn’t something I need on this image but I can shrink or enlarge the white area with Filter > Other > Maximum or Minimum. This may be needed when a well-defined area such as a sky with a simple, fairly sharp horizon line is selected with the Magic Wand, for example. If the tolerance isn’t quite right the area can show a halo at the edge after the adjustment is made. Shrinking or expanding the area subtly may fix the problem.
Similarly, working directly on the mask itself, I can use the Blur or Sharpen filters to modify edges. I can also do Levels or Curves adjustments to a mask to increase or decrease its contrast, or density. With the mask visible in black and white, as shown above, just do Image > Adjust > Levels (or Curves.)
Here’s the finished image. It’s quite a change from the one I started with!

Diane Miller is a widely-exhibited freelance photographer who lives north of San Francisco, in the Wine Country, and specializes in fine-art nature photography. Her work, which can be found on her web site, www.DianeDMiller.com, has been published and exhibited throughout the Pacific Northwest. Many of her images are represented for stock by www.MonsoonImages.com.
