A zillion years ago I took an incredible picture of a friend standing next to a swan that was as large as she was. I was so impressed with that picture, which was the result of an unintentional double exposure. Way back then, you had to advance the film manually from frame to frame, and if you didn’t, boom, two images on the same frame of film. Usually an unintentional double exposure was not worth saving. Later on, manufacturers saved us from such mistakes. But I liked that big swan picture, and was delighted when double- and multiple-exposure capability finally made its appearance in many cameras..
If your camera lets you be doubly (or multiply) creative, you can have lots of fun with these effects. Many film and digital cameras have a double-exposure mode. If yours doesn’t, you can easily produce these effects in the computer, as I’ll describe.
This is easy
The simplest multiple exposure techniques involve combining images that do not overlap each other. When an area of a scene is black or very, very dark, the corresponding area of the film or digital capture medium will not be exposed, so you can record another image there. By using this “blank” space creatively, you can add a moon to a dark sky, turn one person into twins, or make a photograph that looks as if it were painted with an artist’s brush.
Double vision
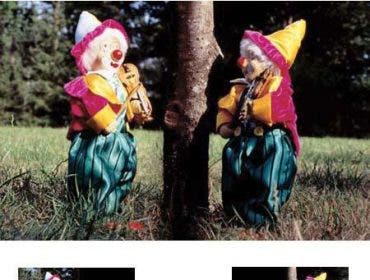
To make a portrait doubly delicious, have your model stand in front of a black background. You’ll need a camera that lets you set the exposure manually. Take your meter reading where it won’t be influenced by the black background (an incident light reading is best). Compose your picture so the model is on one side of the frame. Take your first picture. Then recompose the shot, moving the camera a bit so the model is on the other side of the frame, then take the second picture.
Usually, this technique works best when each of the poses is different. For example, your subject is smiling in one, serious in the other. Or show a full-length view on one side and close-up in the other. How about posing him or her facing the center doing mirrored gestures. Or do the reverse, posing him so he’ll appear back to back with angry expressions. Try having him engaged in two different activities. Or show him wearing different clothes. Once you start thinking of ideas, they’ll come flying and you can spend the whole afternoon playing around. If you’re shooting film, double exposures are economical because you use only half as much film! With digital, you have the advantage of saving whichever images or parts of images work well and discarding the rest.
If you are shooting film, take pity on the person in the film lab and don’t confuse him. If the background of the first picture on the roll of film is black, it will be the same tone as the film leader, and lab guy won’t know where the first frame begins. So be sure the first picture doesn’t have a black background.
In Photoshop: Creating a double portrait in Photoshop is a piece of cake and gives you more flexibility. You can take down that basic black background and photograph your subject any place you like, electronically copying the images and pasting them onto new backgrounds. However, photographing your subject against a plain background will make it easier to isolate him or her later.
Open two–maybe even three– pictures of your subject and a picture for the background. Be sure they all have the same resolution (for example, 300 pixels per inch). Use a selection tool to draw an outline around the first subject (or a masking tool if you have it–this accomplishes the same thing but with more control), then use the Move tool to drag it into place onto your new background. Do the same with the second subject. See, I told you it was easy.
Doing it in Photoshop even lets you overlap the images. Shhh. I wasn’t going to tell you about overlapping images until n time, but I got carried away.
Lunar Bliss
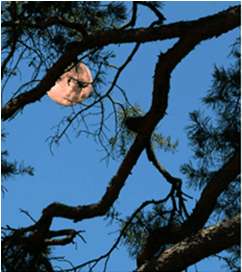
It might be nice to have fireworks in your own backyard or to see the moon directly over your favorite tree. Even if you can’t have it there for real, at least you can create a picture of it. It’s not difficult, but it is a bit trickier than the aforementioned double-exposure methods because you’ll probably have to photograph the moon and the new background at different times. Also, you’ll have to use a film camera, not a digital one for this technique. Sorry about that.
Here’s how it works. You shoot a bunch of pictures of the moon, fireworks, or any bright object, placing it in a different frame position in each shot. You’ll get small moons with a normal or wide-angle lens, and nice big moons with a telephoto lens in the 135mm to 300mm range. After you shoot the moons, rewind the film and take it out of the camera. Then you go to your second location, reload the camera, and take another series of pictures. Placing the moon in different positions and shooting it in different sizes gives you a choice when you combine it with the new background. Remember the sky must be almost black for really good moon pictures.
Pulling the film leader out after it has been wound back onto the film cartridge may seem to be a challenge. However, it’s not hard to do with a gadget called a film leader retriever. The one from Adorama works quite reliably: it grabs the end of the leader and pulls it out of the cartridge. The other seemingly tricky thing is to put the exposed film back in the camera so that the frame lines are aligned for both series of exposures. Fortunately, autowind cameras do a pretty good job of doing it for you. Still, allow room for error by not placing critical images or image details at the edges of the frame.
The thinking person’s job is to place the bright object where you want it, so the moon doesn’t end up in the middle of your roof or on the ground. You’ll prevent this unnatural-looking disaster if you sketch diagrams of where the moon is in each frame. Of course, there’s no reason you can’t take the pictures of the landscape first and then the moon. If you do, then you’ll need diagrams of where the trees, chimney, or whatever, are. Make good diagrams and you’ll get good double exposures.
In Photoshop: This is another easy copy-and-paste job, but it lets you put the moon (or other object) anyplace, and make it as large or small as you want it, or whatever color you choose depending on your skill with Photoshop. For my composite picture, I opened a picture of the moon and picture of the tree. Then I selected the moon and pasted it onto the tree picture. I did a little manipulation with Layers to partially hide the moon behind the branches.
Look, Ma, I’m an Artist!
Just as black subjects will not expose the corresponding part of the film or digital medium, white subjects will completely expose it. Therefore, a second exposure will have no effect in the white area, but, as you know, will let you record another image in the black area. This opens several clever possibilities.
Patterned and T Silhouettes
For example, you can add t pattern, even another image to a subject you photographed as a silhouette. Step one is to make the silhouette by photographing your subject against a plain white or very light background. You could find a white wall, tack up a white sheet, or have your subject stand on a slight hill with sky behind him. No light– or very little light– must fall on the subject, but the white background must be fully illuminated.
A good way to determine the exposure is to meter for the white background and increase the exposure by one or one-and-a-half stops. Use manual exposure or otherwise lock in this exposure setting, and take the picture. Then take the second picture of a t scene, or other normally illuminated scene, metering it in the usual way.
In Photoshop: Open a photograph of a silhouette and one of a pattern, t or scene. On the t picture, Select > All, then Edit>Copy. On the other picture, select the silhouetted image, then Edit>Paste Into. The new image will amazingly appear within the selected area. In our example, you can see the result of adding a t (it was a tinted photo of a laundry-softener sheet; how about that!) to the silhouette of a palm tree.
Painted effect
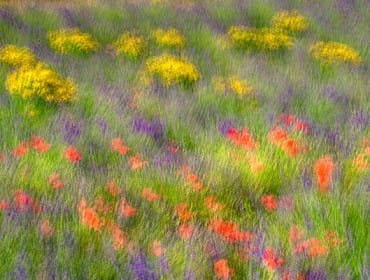
Have you tried and tried to be an artist with paint and canvas but given up in desperation? Despair not. You can do it with a double exposure and just a few strokes of a paintbrush– or a Photoshop brush. Here’s how.
Take a large sheet of white paper, a paintbrush about one inch wide, and some matte, black paint. Using broad strokes, paint an area in the middle of the paper, leaving irregular edges and a lot of white showing. When it’s dry, place an 18 percent gray card over the painted paper and take your meter reading from it. Use that exposure setting to photograph the entire sheet of paper, including the white area of the paper.
This way, the black area will reproduce as black as possible and the white will completely expose the film. Now make your second exposure of a scene or other subject, metering it normally. Your painterly scene will appear within the brush-stroked areas, as in my picture of then landscape.
In Photoshop: The easiest way to do it is to open your scenic image. Then, in Layers, open New Fill Layer>Solid Color. Dark colors work best, so in our example, I picked black. Choose a large, irregularly shaped brush, such as one from the “natural brushes” group. Now, stroke over the middle of the image area, leaving irregular edges. As you “paint,” you will gradually reveal the picture beneath the colored overlay. When you’re satisfied with your art, flatten the layers.
Bravo! You’re an artist.


