Learn how photographer Brian McCarty produced promotional collateral for a brand new art-toy coming onto the market. With a little lighting, detailed staging and some old standbys, watch as Brian brings the Dragon Scout to life!
Bringing toys to life is a favorite pastime for many. For Brian McCarty of McCarty Photoworks, it’s a profession and a passion. No longer an underground movement, Brian has been part of the Urban-Vinyl / Art-Toy scene since the mid-90s. This work blurs the lines between art and commerce, reality and hyper-reality. These unique images truly bring the toy characters to life-size proportions!
The Concept
The Dragon Scout is the second vinyl toy by friend and fellow Los Angeles artist Amanda Visell. I’ve had the pleasure of shooting her characters before, exploring Amanda’s humorously dark vision of a world filled with pink elephants, hobos, and baby-eating crocodiles. Like all of her creations, the Dragon Scout has a well-defined personality with a wealth of character material to draw from. In his own words, “I am the Dragon Scout. I enjoy earning badges, burning things, & eating kids. My troop is always looking for good scouts. Together we can learn about astronomy, how to tie knots, wilderness survival, & citizenship.”
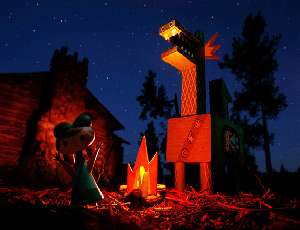
Based on Amanda’s work, it was relatively easy to imagine a shot concept – the dragon looming over a campfire with a girl scout running away into the night. While I had a clear idea of the action and basic composition, the location hadn’t evolved much past “EXT. – CAMPSITE – NIGHT” when the prop hitched a ride with me on a trip to Wyoming in June. What I found far exceeded my hopes for an ideal shooting locale.

A Dude Ranch, Marmots and Bears
As if torn from Amanda’s world of dark humor, the remains of the White Grass Dude Ranch sit near the trail head to Death Canyon in the Grand Teton National Park. Built around 1920 and placed on the National Register of Historic Places in 1990, the rustic log cabins are in the process of being rehabilitated. Although it’s still boarded up for the most part, the site will eventually become home for the Western Center for Historic Preservation. [Figure 1]
I quickly scouted the location a few hours before sundown, sending whole families of marmots scurrying for cover under the cabins. Glancing back down the road where we had just walked, a grizzly bear and her two cubs eyed us with suspicion. I realized that my can of bear spray had been left in the car. My crew and I opted to leave the area for a while to have a hurried dinner at the nearby Moose Trading Post, hoping Mama Bear would lead the kids off to do the same.


Setting up the Shot
We returned about an hour and a half before sundown and hiked the gear a short distance to a cluster of cabins on the far side of the camp. I unpacked my Canon 5D, a Canon EF 24mm f/1.4L II USM lens, and an angle finder. The rest of the gear was left with my assistants as I wandered to find the exact spot to setup.
On any shoot, this is the time I need to resolve the composition I have in my head with what I see through the viewfinder. It’s the blending of an imagined reality with the actual setting, and sometimes it takes a mental shoehorn to make it all fit correctly. In the span of minutes, I debate what feels like a million potential camera and prop placements, eventually settling on one spot to setup. It’s rare that I’ll move the camera past this point, focusing on the fine positioning of all the elements to complete the composition.
I started setting up the lights as my assistant dug a hole for the camera and stand. To get the slight upward angle I wanted on the Girl Scout, the camera had to come down about four inches. With the lights assembled and hole dug, I worked to lock down the camera and props before the daylight faded. The Dragon and campfire fit into the composition immediately, but the Girl took some debate. I knew I wanted her framed by the cabin, but she was slightly beyond my depth of field. Looking at the final shot, I love the little bit of blur.
I eventually came to the same conclusion while looking through the viewfinder, but only after spending more time than I should have working to recompose her in perfect focus using close up filters. The light had all but gone by the time I ditched the filters and locked everything down. A Photoflex RockSteady Bag and Weightbag, both filled on location, were used to keep the camera stand completely immobile. Small pieces of wire kept the props in place.


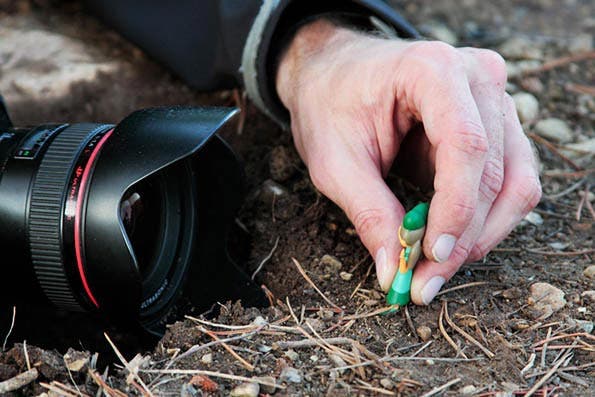
Here’s a few behind the scenes shots to give you a feel for the scale of the toys compared to the surroundings.


A Mix of Lights
Don’t laugh, but I used my twenty-year-old Nikon SB-24 as the sole strobe for the shoot. It’s been with me since high school, and despite massive advances in portable lighting, there is a sentimentality that I cannot shake. The flash has a permanent spot in my travel kit alongside younger, more powerful units. He’s just my buddy, and with the addition of a Photoflex LiteDome® xs Kit, he has a new lease on life.
The light was placed in an obscured position behind the campfire on a 2200 LiteStand. It was aimed at the cabin wall, gelled with Roscolux #19: Fire, and set to full. A Quantum Turbo 3 battery provided power.


The primary light source was an LED assembly that was built the week before from parts found at a local electronics store. To simulate the varied color temperature and light pattern of fire, I melted pieces of Roscolux #20: Medium Amber onto the bare “white” bulb.
It took a fair amount of trial and error to create a satisfactory layering of gel. The finished assembly was brought to the location and mounted into the dirt directly behind the plastic campfire. A buried wire ran off-camera to two AA batteries that provided power for the light.

I enlisted two Surefire flashlights to complete the lighting design. The first was gelled with Roscolux #18: Flame and Roscolux #104: Tough Silk, intended to light the front of the campfire and immediate area. The second was gelled with Roscolux #3202: Full Blue and paired with a 32″ White/Silver LiteDisc mounted to the right of the frame on a 2212 LiteStand via a LiteDisc Holder. I intended to bounce the relatively blue light and provide a contrasting fill on the Dragon and Girl. A 12″ LiteDisc was the final piece of the puzzle. It was hand-held front-left to kick a hint of both fire and blue light back on the Girl’s face.
Show Time
With everything set, I took a series of test exposures while waiting for the last hints of orange daylight to fade in the sky. My crew got a little distracted watching bats stream out of one of the cabins to attack the clouds of bugs in the air. I’m pretty sure that a copious amount of Deep Woods Off is the only thing that kept the mosquitoes from carrying us away. I also imagine that the stench of it kept the bears from wanting anything to do with us. That, and every once in a while one of the crew would clap or burst into song, hoping to deter any critters from coming close.
A few show tunes later, the sky had just the faintest hint of light left, enough to silhouette the cabin and trees. I set the camera to ISO 100 – f/22 – 5200K, and got ready to bring all of the elements together via a 4-minute bulb exposure that I timed with a stopwatch.
A 4-minute Exposure
A lot of things happened over the course of the 4-minute exposure. The LED continuously lit the Dragon from below while giving the Girl a strongly defined edge. The strobe aimed at the cabin wall was fired approximately ten times to provide the halo of campfire light behind the Girl. I next used the warmly gelled flashlight to essentially paint in the front of the campfire and foreground for approximately 10-seconds. The remaining flashlight, gelled to 5500K, was spot-bounced off the 32″ white reflector onto the sides of the Dragon and Girl for approximately 15-seconds. The 12″ reflector on the front-left was also hit with a second or two of the blue light, but its primary duty was the continuous reflection of all mixed light added to the scene.

Finishing Touches in Post
The last steps to complete the photo happened in post-production. Contrast and colors were enhanced. Camera noise was removed, along with a stray tree branch that annoyed me.
And my apologies to the remaining purists out there, but the stars were added as the final touch. I had grand plans of capturing stars spinning across the sky in a several-hour-long exposure, but it was not to be. An exhausted and bear-weary crew was ready to call it quits at midnight after a very long day and night.
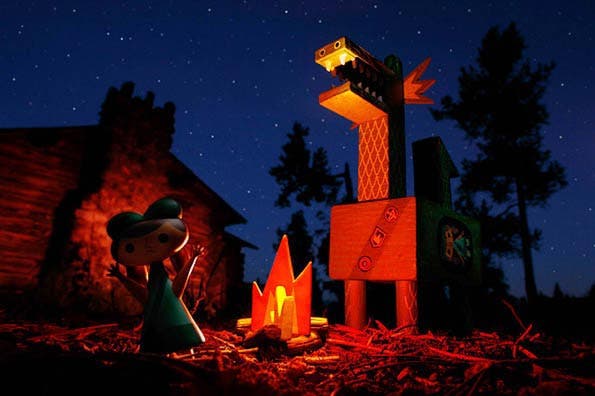
I’m very happy with the resulting image. I sincerely hope you enjoy it along with the peek behind the scenes!
Related Products:
- Canon EOS-5D Mark II Digital SLR Camera Body, 21.1 Megapixels with 3.0″ TFT LCD – USA Warranty
- Canon Angle Finder C
- Rosco The Strobist Collection, Strobist 55 Piece Cinegel Filter Kit with Lumiquest Gel Filter Holder, 1.5″ x 3.25″ to fit most Shoe Mount Strobes
- Canon EF 24mm f/1.4L II USM AutoFocus Wide Angle Lens – USA
- Photoflex Litedome Complete Studio Kit, Extra Small LiteDome, Basic Connector, ShoeMount Accessory, FlashFire Wireless Trigger/Receiver, Small LiteStand
- Photoflex Litedisc 12″ Circular Collapsable Disc Reflector, White / Silver
Learn more at the Adorama Learning Center:
- Pinpoint closeup lighting
- Nighttime is the right time for fun photos
- Night Shots: AdoramaTV
- How to Lightwrite
Photographed and written by Brian McCarty, contributing instructor for PhotoflexLightingSchool.com
