When you work on a file in Lightroom and Photoshop, you may end up with a lot of layers. Here’s how you can quickly compare before-and-after versions with no muss or fuss.
When I work up an image, I first do as much as I can in Adobe Lightroom. (If you don’t use Lightroom, you have the same raw adjustment capabilities in Adobe Camera Raw.) Most of my images will get further tweaking in Photoshop, for things such as cloning, local adjustments in difficult-to-mask areas, and for “artistic” filters that alter the pixels in a layer.
In the case of filters, if the program doesn’t do it for me, I’ll make a copy of the layer to which I’m going to apply the filter so the original is preserved. This gives me both an out and a record of where I started. For adjustments, I always make an adjustment layer. Instead of using Image > Adjustments, use Image > New Adjustment Layer or the shortcut black/white circle at the bottom of the Layers Panel/Palette.
With each individual adjustment step thus separated into its own layer, each can be individually tweaked later, which is sometimes desirable as new adjustments are added or as I have a second look at an image. And if I want to tweak the shape of a mask, I can’t do it if the adjustment has been made directly on a pixel layer.
This strategy leads to a lot of layers (which will always remain as part of the master file) and often I want to be able to see clearly what I have done in each with a before and after view. There are several tricks I find useful, the most powerful being Layer Comps. But first, here are three simpler ones.
Toggling an individual brushstroke
As you paint a mask for an adjustment layer it can be hard to see exactly what changes you have made. It is sometimes useful to toggle the last brushstroke with Ctrl-Z (Cmd-Z for Mac). The first keystroke backs out of the brushstroke and the next one restores it. (To step back further, go to the Menu Bar and click Edit > Step Backward or click earlier steps in the History panel. Of course, you can undo the undo steps.)
Toggling the visibility of an adjustment layer
After I make each adjustment I toggle its visibility on and off by clicking the eyeball of the adjustment layer, circled in red in the figure below. This before-and-after comparison is the only way I can clearly see what I have done.

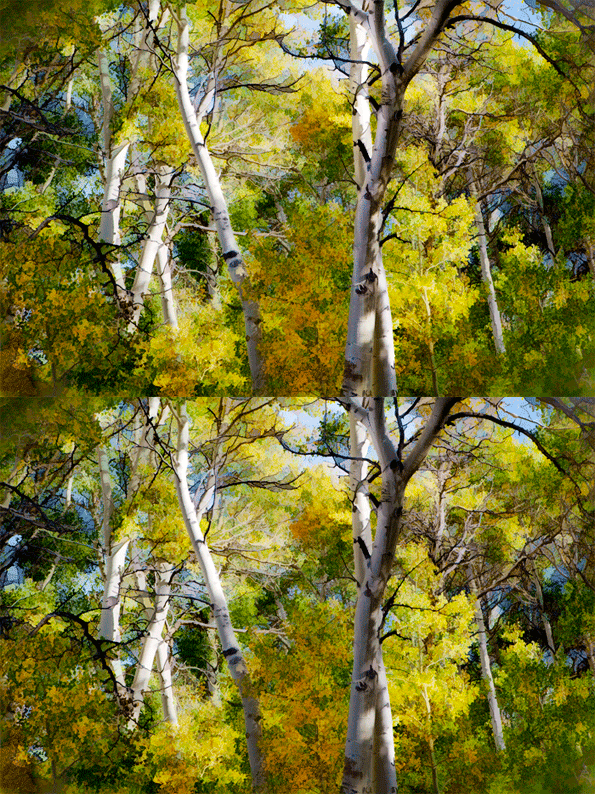
Toggling the visibility of an adjustment layer helps me see things such as a clumsy edge on a mask. In this image I used a masked Curves adjustment to lighten the tree trunks. I have simulated toggling it on and off in the figure below, which is an animated GIF:
Back to the Beginning
If I want to flash back to see my starting point before the entire layer stack, it isn’t necessary to turn off all the layers one by one. I just hold Alt (PC) or Opt (Mac) and click the eyeball of the original Background. All the other layers will be turned off and only the Background layer will be visible. The same key combination will turn everything back on.
Layer Comps
Sometimes I make two versions of an adjustment layer and I’d like to see a quick comparison between them. If I first turn one off and then turn the other on, I have to mentally block out an intermediate step where neither adjustment is on or both are. But I can flash directly between two such states using Layer Comps, which represent two or more states of layer visibility.
Here is an image with two different masked Curves layers that darken the sky differently. If I want to toggle between them in one step, I first turn on one of the layers (with its eyeball) and then go to the Layer Comps menu.
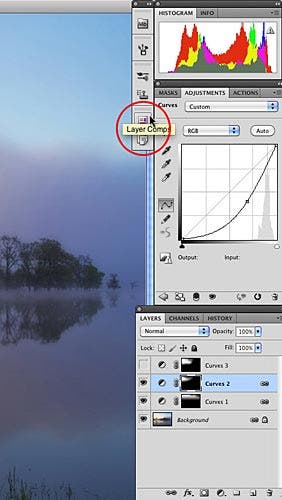
This illustration is for Photoshop CS5. If you don’t have this panel layout, go to the Menu Bar and click Window > Layer Comps.
In the upper right of the Layer Comps window, under the arrow-shaped cursor you see in the figure, there is a symbol for a dropdown menu. I click it and choose New Layer Comp.
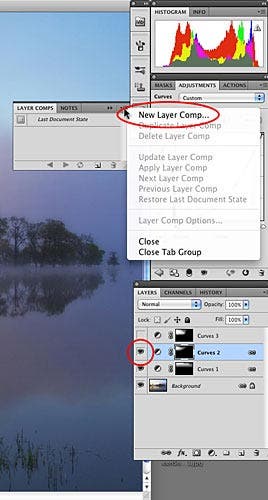
In the dialog box that then comes up I just click OK. Then I turn off that adjustment layer and turn on the other one (above it in the Layers panel in the figure above), and repeat these steps. I now have two Layer Comps. I can click the box to the left of each one to turn on the state of the image when I created it. Here is the first one:

And here is the second:
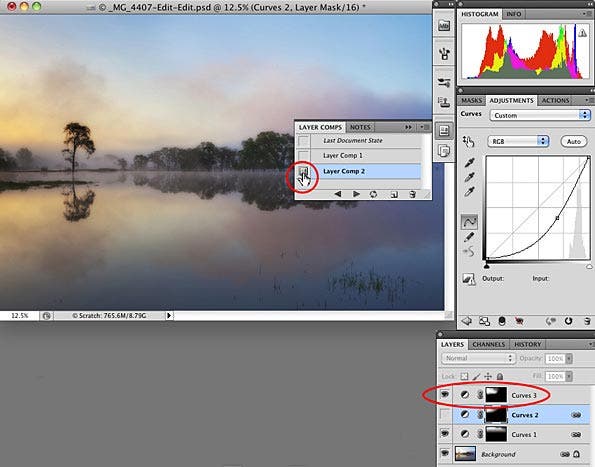
The differences are much more obvious in a toggle than in the two side-by-side views above. Here is another animation to show the result of toggling:

To get the Layer Comps panel out of the way I click the double-arrow to the left of the dropdown menu and it will dock against the main panels, or I can close it by going to the Menu Bar and clicking Window > Layer Comps. The Layer Comps won’t be saved with the image, however; when you close it, you will loose them.
These methods for instant toggling between two versions or steps will let you see things you can’t see otherwise. But be aware that changes can look more dramatic this way than they would in two side-by-side prints.
