Noise always increases with ISO and there is no magic bullet for it, but it is controllable with a little care.
Shooting in low light often means we need to boost the ISO, which leads to more noise in our images. And that leads to more care in post-production. Here’s how I mitigate noise after the shot. I really dislike noise, and a few years ago I hated to venture above ISO 400. Now I have the full-frame Canon 5D Mark II and with the right subject I can shoot at ISO 3200. But I won’t go to such an extreme ISO unless I couldn’t get the shot otherwise.
From a standpoint of image quality I would always prefer ISO 100, and in low light I would prefer to be able to use a tripod and a long enough shutter speed to get the proper exposure. And, of course, I would turn on Long Exposure Noise Reduction. But some subjects won’t sit still for a long shutter speed. And there are places I can’t take a tripod (museums, for instance) and places forbidden to tripods are also often not well-lit.
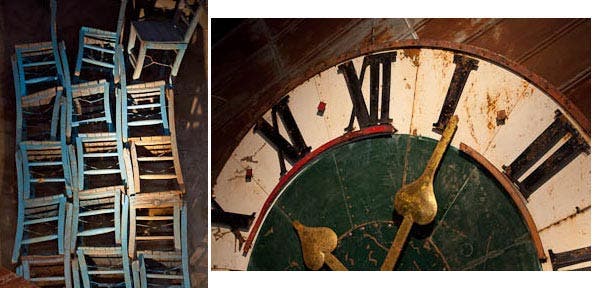
Flash isn’t always an option, either, especially when the ambient light is what you want to capture, such as in the shots below in Artefact Design and Salvage, a wonderful and unique antique shop at Cornerstone Gardens in near Sonoma, CA. The chairs and clock are hanging high on a wall, and I used my Canon 70-200 f/2.8 with image stabilization to ensure sharpness. A tripod would have been in the way of customer traffic and a hazard, so I dialed in ISO 3200 and hand held. Freedom from a tripod allowed me to playfully explore the nooks and crannies and the lovely ambient lighting in this fascinating place. The shutter speeds were 1/45 sec at 85mm for the chairs and 1/180 sec at 70mm for the clock. Both were at f/6.7, which gave me enough depth of field. (I might have been wise to go to an even wider aperture to get faster shutter speeds, especially on the chairs, but I got away with it this time; the images are sharp. Next time I will probably get bitten.)
Noise always increases with ISO and there is no magic bullet for it, but it is controllable with a little care. And a rather busy subject can help conceal noise.
Both of these images are straight out of Lightroom 3 with basically its default raw conversion settings. I have done no noise reduction other than Lightroom 3’s very conservative defaults. The images have had some modest color correction for the indoor lighting, and saturation was boosted slightly. Here is a 100 percent enlargement from the clock image, showing the remarkably low noise. (The chairs and everything else I shot at ISO 3200 there show similarly low noise.)
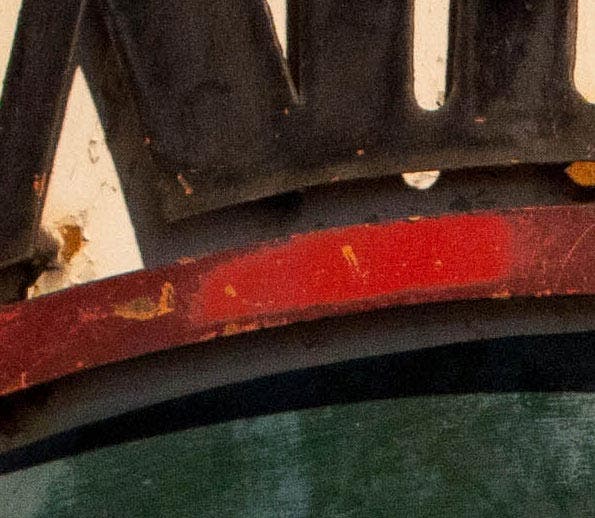
But I am not always so lucky with noise, and often need to minimize it at the raw conversion level, and sometimes reduce it further in Photoshop. I use Lightroom 3 or the equivalent Adobe Camera Raw 6.3 (as of this writing) that accompanies Photoshop CS5, which has improved noise reduction over earlier versions.
The best strategy for minimizing noise is to avoid the need to increase exposure or contrast in post-processing. If you can, have a look at the histogram after a shot. If the camera’s suggested exposure leaves the dark tones too dark, and if you have leeway to increase the exposure without blowing out highlights, do so. You can darken the highlights and mid-tones in the raw processer. But be careful not to blow out whites beyond recovery. (More about that below.)
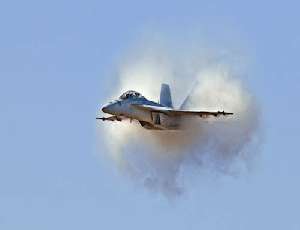
But sometimes, even with the best exposure you can muster under the circumstances, there will be dark areas in an image that you want to lighten to effectively increase the dynamic range and in that process you may bring out more noise than you like. This can happen in bright light as well as low light. An example is the following image, which I shot at an air show of an F/A-18 going transonic (approaching the speed of sound). I was using my Canon 300mm f/2.8 lens with a 2x teleconverter. This guy was moving fast! The lens was supported by my Wimberley II head set to gimbal freely so I could follow the plane. The aperture was f/9.5 to give me a little leeway with depth of field, and with a 600mm focal length I needed a fast shutter speed. To get shutter speeds of around 1/1500 sec I needed to set ISO 400.
I had all focus sensors selected and AI Focus set to allow autofocus to follow the subject, which was moving toward me at probably 600 mph. I left the exposure on Auto and trusted the camera not to blow out the highlights. Autoexposure on the Canon 5D Mark II is usually smarter than I am, and a lot faster. With a significant expanse of blue sky biasing the exposure reading, this isn’t a bad strategy.
Here’s my raw capture before any adjustments, with the default settings in Lightroom 3.

The highlights have good detail and are even slightly underexposed. As is the case with raw files, in order to represent the most tonal detail, the image has low contrast. That’s a good thing because I can increase the contrast with the raw conversion sliders.
Here’s the image after I made what I felt were optimal raw adjustments in Lightroom, including using the Adjustment Brush to lighten the fuselage.
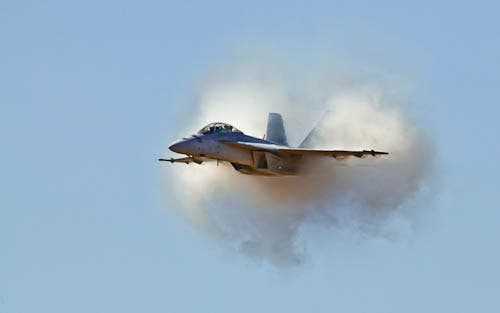
I always do everything I can in the raw converter before bringing an image into Photoshop. This is doubly important in images where noise is a concern. I begin work on every image by setting the tonalities. First I set the Exposure slider, paying attention to the right end of the histogram as I move the slider, so the lightest tones are of the desired brightness but there are no blown-out whites. If the histogram is pushed up against the right wall I have highlights that are pure white with no detail. That’s unavoidable for specular reflections of the sun from chrome and the like. But if I let tones that aren’t supposed to be pure white push against the wall, they can’t be salvaged later in Photoshop.
Sometimes tones will show as blown out in the initial raw parameters. If they aren’t too far overexposed I can bring the Exposure slider to the left to recover them, but there is a limit of one or two stops in how much I can lower Exposure and keep a decent image. If the camera’s exposure was way too high, there is no way to salvage highlight detail.
Then I try to maximize the detail in the darks by balancing the Fill Light and Blacks sliders. Adding Fill Light will lower contrast in the darker tones so I need to set the Blacks slider to keep the darkest tones at a level appropriate to the image. (Not every image should have its darkest tones at completely black, but most will.) Don’t trust your eye and monitor on this, or on the whites; look at the ends of the histogram. If appropriate I will use the Adjustment Brush to further lighten certain areas.
Then it’s time to see what I have done to the noise. I go to the Detail panel (or tab, in Adobe Camera Raw) and carefully increase the Luminance Noise slider if necessary. (I make sure I’m viewing the image at 100% in order to see the subtle effects.) I’m careful not to go so far that I lose detail, which can start happening around 25 or even lower. The Color Noise slider is usually fully effective at its default of 25. If can generally increase it all they way with little or no visible damage to the image, but I wouldn’t go beyond the point where it stops showing an improvement.
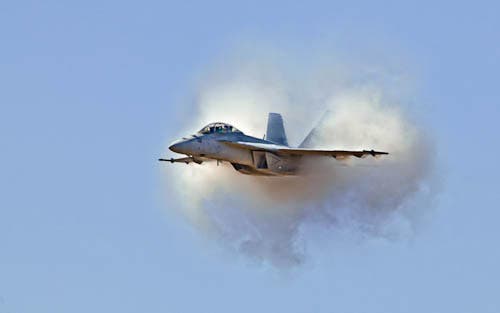
At this modest ISO of 400, the tonal adjustments I made have brought out more noise than I like in the fuselage. But, in a quest for drama, I wanted to lighten the fuselage further and bring out a little more detail in the condensation cloud, so I went into Photoshop and came up with this final image.
Here is a comparison of the noise in the initial raw file, the adjusted raw file and the Photoshop file, left to right.
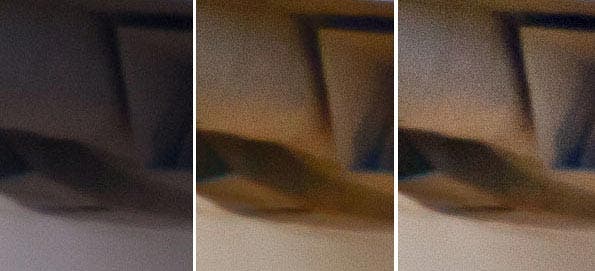
You can see how the noise is hidden in the initial dark and low contrast image, but as the dark area is lightened and contrast boosted, it is brought out. If you have done all you can in raw conversion you will be starting with the lowest noise possible for further work in Photoshop. Using a second round of noise reduction in Photoshop is a good strategy. There is a built-in noise reduction filter in Photoshop (go to Filter > Noise) and there are several plug-ins which offer more control, such as Nik Dfine, Noise Ninja, Topaz DeNoise, Neat Image and Imagenomic Noiseware.
But no noise reduction tool is magic. At some point reducing noise will reduce detail. This is as far as I felt I could go with this image without softening it, and that was for an image that wasn’t tack sharp to start with. This plane was coming at me fast and the air was dirty with heat waves and air show smoke. With steady panning on a Wimberley II head, focus tracking on, and shooting in burst mode, this was the best shot I could possibly get. The next one was sharper but the nose was cut off. It never fails. Tracking such fast motion with a 600mm lens isn’t easy!
The best strategy is to avoid noise in the first place by shooting at the lowest possible ISO and, if possible, an exposure that will avoid the necessity of too much lightening of shadows. And, of course, cameras differ in noise. The larger photosites (pixels) of a full-frame camera and the better noise reduction algorithms of newer and higher-end cameras will give you the best starting point.
Setting the camera for Long Exposure Noise Reduction will help in the case of exposures over a few seconds. After the exposure the camera will shoot another image with the shutter closed, called a dark frame, and subtract the component of noise that comes from hot pixels.
Another strategy, with a still subject, is to shoot several exposures and combine them with an HDR program to get more detail in the shadows without adding noise. But doing single-image tone mapping in an HDR program will generally bring out noise.
For images that can be shot on a tripod with a still subject, you can reduce both color and luminance noise with the method of layer averaging, with no loss of detail or softening. Here’s how it works: Shoot from 3 to 10 or more absolutely identical images. A large component of noise is random and will vary between the different images.
Begin by stacking the images as layers in Photoshop. Align them by holding the Shift key as you drag from each individual image window onto one that will become the stack. Then check the alignment by zooming in to 100 percent and turning off each layer from the top down. Sometimes they don’t align perfectly.
If they don’t, and if you have Photoshop CS3 or later, select all the layers and click Edit > Auto-Align Layers. Otherwise you can nudge each layer with the Move tool until it lines up with the one below. (Use the arrow keys.) To see the alignment precisely, set the Mode of a layer to Difference (at the top left of the Layers Panel / Palette) and the image will go black when it is perfectly registered to the layer below.
Now to the blending step. Leave the bottom layer at 100 percent opacity and reduce the opacity (in the upper right of the Layers Panel / Palette) of each layer above it by dividing 1 by the number of the layer, counting the Background layer as Layer 1. (You can rename the layers to make it easier.) So the second layer is Layer 2 and its opacity is ½, or 50 percent. The third layer is 1/3 or 33 percent. The fourth is ¼ or 25 percent, etc.
In the figure below, the top half is a 100 percent enlargement from an image I shot at ISO 25,600, the highest my camera will go. The bottom half is 5 identical exposures stacked and averaged. And I could have achieved even more noise reduction by adding more layers. I have made no adjustments in raw conversion; these images are straight out of Lightroom 3 with its default settings.
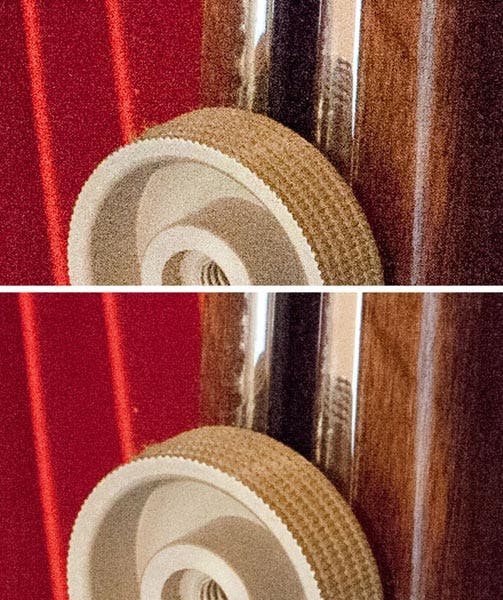
Shooting at such an extreme ISO results in some loss of color but a boost in Vibrance can bring the colors back to a very acceptable level.
(Bonus tip: This is a great way to emulate an in-camera multiple exposure, using a sequence of normally-exposed shots at slightly different camera positions.)
