My Audio-Technica turntable has a built-in pre-amp and comes with cables to hook right into my Mac’s 3.5mm audio-in so I easily import all my old records into my iTunes library via Adobe Soundbooth or Garage Band.
Some very cool things have been happening in the world of turntables and computers in the past few years, and this all adds up to much easier analog-to-digital conversion of your crate of old vinyl.
First, many turntables now come with a built-in pre-amp to boost the signal, meaning that these turntables can be hooked directly into pretty much anything with audio-in lines. The pre-amp applies an RIAA equalization curve (here’s more on this on Wikipedia) to the signal from the record to make it play back as it was intended. If you use an older turntable without a built-in pre-amp–or with the pre-amp switched to off–the resultant sound file will seriously lack bass and deep tones.
Second, just about every MacIntosh computer sold in the past few years, along with most Windows Towers and quite a lot of PC laptops have a mini (3.5mm) audio-in line.
From here, It’s really just a few wire connection plus a few mouseclicks to spin your vinyl into iTunes via an audio capture program.
I have personally been using Adobe Soundbooth CS5 for this task, as this on-track audio editor makes the most sense to me as a visual person, and it makes it super-easy to split the side of the record into individual songs for adding to iTunes.
For this walk-through we’re going to import “This is Radio Clash” and “Radio Clash” from the 12″ single released by the Clash in 1981.
Step 1

We launch Adobe Soundbooth CS5 and click the Record button to launch this dialogue box. The settings button used to select the audio source and adjust the volume of the audio in–you may have to experiment with the audio levels a bit. We want to make sure we are recording in stereo. I usually check the box to monitor the audio during import and listen via headphones to make sure the sound quality is good and the record isn’t skipping. Pushing the start button on your turntable puts stylus to vinyl and clicking the red record button in the Soundbooth dialog box starts recording. Click the stop square when the side of the record has played.
Step 2

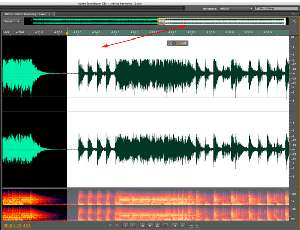
Here we are looking at the wave forms of side one of this album which contains two tracks. The red (1) indicates the start of the record, the red (2) is the silence between track 1 and 2, and the (3) is where the stylus lifted off the record at the end of play.
Step 3

Here you can see we have selected the first track on this album. We are looking at a more granular time slice to ensure we hit the end of the first track without cutting off any of the song. Now we copy the first track via Edit>Copy.
Step 4

File>New>Audio File from Selection will open a new file with the first track we’d just copied.
Step 5
We then Save the file, naming it exactly as it is named on the record, and select a format. Here we choose a high-quality MP3 for playback on my iPod. I save all my ready-for-iTunes tracks in a folder called “ToiTunes.”
Step 6
We then go back to the original waveform and repeat the Copy>New file from Selection path for however many more tracks there are on the side of the album.
Step 7
Once all my tracks are saved as MP3s, I open the “ToiTunes” folder and sort it by Date Modified to get the most recently created files to the top. I highlight these and drag them onto the iTunes icon to add into my library.
Step 8

Once we’re in iTunes, we click on “Date Added” to again make our just-added vinyl tracks rise to the top. As you can see, they have track names, but need more information. We select all the tracks we’ve added from this album and click Apple+i (CMD+i on PC) to add more file info. We add the band, album, composer, genre, etc, click OK, and that’s all there is to it. Our vinyl tracks are now fully integrated into our iTunes library!
What about Garage Band or Audacity?
It isn’t that much tougher to import full sides of an LP using Mac’s bundled Garage Band. (Just make a new real instrument track, start the LP on the turntable and click the “Record” button then Share the whole side as a track into iTunes. Splitting the tracks in Garage Band is a bit more difficult, but is definitely do-able.)
And likewise, there’s a lot of people who love the free Audacity audio editor for both Mac and PC (just give it a Google to download this freeware). The big steps of importing and splitting the side into the different tracks is the same, even if the interface is a bit different and geared more towards experienced audio editors.
Whichever audio editor you use, you’ll love hearing that lead-in hiss and pop long-out-of-print records you haven’t heard in years playing through your computer’s speakers for the first time. I know I did!
Did you know it was this easy to import your vinyl into iTunes? What albums do you have that you have or would have digitized first? Let us know!


