In an earlier tutorial I showed how to create a faux Lensbaby effect in Photoshop. But like many digital darkroom techniques, it can’t quite replace the real thing.
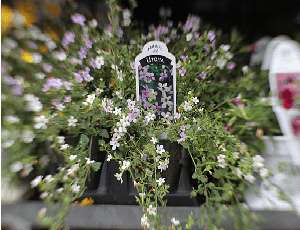
I have recently revisited the Lensbaby, and I love what I’m finding. Lensbabys have a fixed focal length of 50mm and a lens design that gives a sweet spot and a zoom-like out of focus effect to the edges of the image. These special effects are a wonderful way to deal with distracting backgrounds, simplify cluttered edges and give a sense of motion.


Moving the sweet spot
The sweet spot can be moved in the frame by bending or tilting the front of the lens in the direction you want to move the focus point. In the picture below I have focused on the flower to the right, throwing the left one even more out of focus. It is possible, especially with cameras having smaller sensors, to bend the lens enough to move the sweet spot outside the picture.

Aperture rings
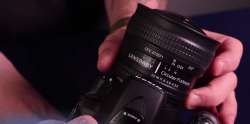
 You control the size and sharpness of the sweet spot and the degree of edge softening by inserting magnetically-held aperture rings in front of the lens element. With various Lensbaby models the aperture rings range from f/2.8 to f/22. Smaller apertures give a larger sweet spot and greater depth of field; apertures larger than about f/4 may not have enough depth of field for a sharp sweet spot. As the aperture becomes smaller the viewfinder will be darker. With a regular lens you are looking through the viewfinder with the aperture wide open and it doesn’t stop down until you take the picture. With the Lensbabys you may need Live View mode to use the smaller apertures, as the camera’s LCD screen will show you an image normalized to a good brightness. Most people prefer to use aperture rings in the f/4 to f/8 range. At these apertures, the viewfinder is bright enough.
Due to its cropped image area, a smaller format sensor will need a ring with a smaller opening to give the same edge softening effect as a full-frame sensor.
Removing the aperture ring completely (which gives f/2) will give an interesting bokeh effect and a softer sweet spot due to very limited depth of field.

Shutter speed and exposure
If your camera supports autoexposure with a Lensbaby (see below) it will be setting the necessary shutter speed, but exposure can sometimes be quirky. It pays to check the histogram so you can repeat a shot with exposure compensation if needed. With smaller apertures and in lower light you will be getting slower shutter speeds and you may need to increase the ISO if you are hand holding or if subject movement is an issue. To hand hold a 50mm lens you would generally want to keep the shutter speed at or above 1/60 sec. If you have steady hands and a very sharp area is not critical for the image, you might get away with a slower speed.
With the Pinhole / Zone Plate Optic (see below) the apertures are very small. Stray light getting in the eyepiece will fool the meter into underexposure. With normal apertures it is often negligible but it can be significant at these small apertures. Just shading the eyepiece may not be enough; you may have to cover it snugly.
 Focus
Focus
Focus is manual, by pushing and pulling the flexible tube on the Muse and Control Freak models (updated versions of the Lensbaby 2.0 and 3G) or twisting the focus ring on the Composer. The Muse is used freehand, bending and pushing/pulling to focus in one motion. The Control Freak lets you shoot freehand or lock the bellows position and then fine-tune focus with a lever. The Composer is a more streamlined design that accomplishes the tilt with a ball and socket mechanism and has a twist ring to focus. Various models focus as close as 12-18 inches.
With the Composer, the front of the lens element moves forward at close focus. If the sun or other light sources are hitting the glass, you will need to shade it if you wish to prevent image degradation from flare.
It can take some practice to see the focus point accurately and it can be a good idea to shoot several attempts at focus. (Make sure the diopter on your viewfinder is set correctly for your eye. Aim at a featureless area such as sky and rotate the dial beside the eyepiece until the focus point rectangles and center circle you see in the viewfinder are sharp.)
 Although the Lensbabys are wonderful and fun for spontaneous effects, if you are using one of the Lensbabys that can lock focus (the 3G or Control Freak) and if your camera has Live View, you can achieve very accurate focus. You will want to be on a tripod. First set the tilt and focus as best you can through the viewfinder. Then go to Live View, which displays the image on the LCD screen instead of through the viewfinder. Use the camera’s joystick to move the zoom rectangle over the chosen focus point and zoom in partway. Refine both the focus point and the focus at this magnification and then zoom in further for a final focus tweak. With the Double Glass optic (the various optics are explained below) and an aperture ring of f/4 or smaller, this will give a sweet spot that is tack sharp.
The Lensbabys achieve the sweet spot with blurred edges because the lenses have a curved field of focus. If the focus distance is not set correctly for the object in the sweet spot, you can get a ring effect as shown in the figure below. It is rarely this dramatic and you may not notice it until you have the images in the computer.

Customizing the optics
The newer Lensbabys (the Muse, Control Freak and Composer) have optics that can be swapped. The Double Glass Optic is sharpest, and will give a tack sharp sweet spot with proper technique (accurate focus, camera steadiness and shutter speed). It is standard with the Composer and Control Freak. The Muse can be ordered with the Double Glass or the softer Plastic Optic. There is also a Single Glass Optic that resembles antique camera lenses. It is not coated and will have more flare and chromatic aberration then the Double Glass. A Soft Focus Optic gives an overall dreamy look and does not have a sweet spot. A Pinhole / Zone Plate Optic gives the softest look and also has no sweet spot. There is no glass in this optic and focus is over a very wide range due to the small apertures.
The Pinhole mode has a tiny aperture and everything will be soft; the Zone Plate mode will produce a soft image with very diffused, glowing light and low contrast. You switch between the two modes with a sliding plate that contains the two aperture holes. (Be warned: These small apertures will really show the dust specks on your sensor, beautifully set off by the soft subject.) There is also a 12mm Fisheye Optic, which also has no sweet spot. It focuses down to half an inch and requires a special adapter for the Muse or Control Freak in order to keep the back lens element from hitting the camera mirror.
 Accessories
You can get a range of accessories for your Lensbaby. These include diopters (4x and 10x) that let you focus very close, telephoto, wide angle and super wide angle adapters, and aperture rings with shapes such as stars and hearts and a lens shade that also serves as a step up ring so you can use 52 mm filters such as a polarizer.
The diopters are my favorite accessory, and they can be used on the older Lensbaby models as well. If I’m right at the closest focus, the focus ring on my Composer isn’t as precise and well damped as my macro lens and it can take several tries tweaking it back and forth before it lands exactly where I want it. But this is a problem my macro focusing rail solves beautifully; I get the focus close and fine-tune it with the rail. But since you can stack both the 4x and 10x diopters, you can usually back off the focus just a little to where the movement is more precise.
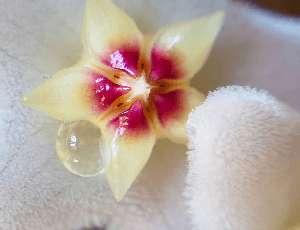
Here is an image of a Hoya blossom cluster with the 10x diopter. (This is the full image on a full-frame camera.) Each blossom is half an inch in diameter, and before I made this image I never realized the white petals were hairy. This was with the f/8 aperture ring, so the depth of field was less than optimal at this magnification.

Here is the result with the 4x and 10x diopters stacked:

Even with a subject that is very three dimensional at this magnification, I was able to get very good clarity, as you can see in the zoomed-in view below. Using a smaller aperture would have resulted in even more sharpness due to the larger depth of field.

Cameras
Lensbabys come in mounts for most popular DSLRs: Canon, Nikon, Pentax, Olympus 4/3 and Sony. You will have autoexposure with most Canon and Nikon bodies if you use Aperture Priority or Manual mode. You can’t use Shutter Priority, Program, or any of the Picture Styles because they are dependent on the camera being able to control the aperture. Complete information can be found on the Lensbaby web site.
Creative effects
You can do virtually anything with a Lensbaby that you can with any other lens. You can use flash, although with some cameras TTL metering may not work. In that case you can set the flash to Manual and experiment to find the power needed for the subject distance. And don’t forget bounce light from a reflector. You can use burst mode, shoot HDR, multiple exposures, and video. And you can do all your favorite post-processing effects. Black and white can be a very effective treatment for the unusual style of a Lensbaby image.
Jump in
A Lensbaby is a different kind of lens and can take some getting used to, but what it can do is well worth some exploration. Lensbabys can produce images that are drop-dead gorgeous, and they invite you to explore your photography in an exciting new way. My friend Barbara Nebel recently got one and the image below is her very first shot with it. I can’t wait to see where she goes from here!

Diane Miller is a widely exhibited freelance photographer who lives north of San Francisco in the Wine Country and specializes in fine-art nature photography. Her work, which can be found on her web site, http://www.DianeDMiller.com, has been published and exhibited throughout the Pacific Northwest. Many of her images are represented for stock by Monsoon Images and Photolibrary.


