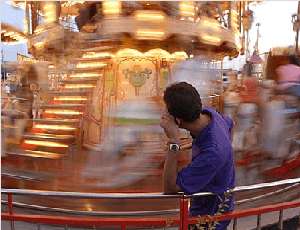
Go ahead—move your camera, zoom your lens, encourage your subjects to move around, and even throw your camera…while the shutter is open. Welcome to the wonderful world of slow shutter speed and camera and subject motion!
1. ZOOM DURING EXPOSURE
But like all tricks it can be entertaining, especially if you don’t overdo it, or you give it a few twists.

You probably remember the conventional zoom technique. Use a shutter speed of about 1/8 to 1 second, hold the camera steady (or mount it on a tripod) and zoom through a 2x to 4X range of your zoom lens‘s focal lengths (for instance, 35-105) while taking the picture. The result is an explosion of lines converging on the subject. Gimmicky, but still kinda cool.
Now you can add a few twists. Naturally enough, these add some unpredictability. For example, you can gently swoop the camera as you zoom. Or you can pan and zoom simultaneously. But like trying to rub the top of your head and belly in opposite directions, this may exceed your coordination abilities. With a little practice, however, you can add some nice alternative zoom effects to your repertoire.

Since the technique requires slower shutter speeds, you may want to arm yourself with a couple of polarizing or neutral density filters so you can use it even on fairly bright days.
Alternatively, and you’re probably already muttering to yourself about this, you can create similar effects in Adobe Photoshop. Just go to Filter > Blur > Radial Blur and click on the zoom effect in the window that pops up. Vary the amount until you find results to your liking. The results are a lot more predictable and not nearly as entertaining as doing it manually and experimentally in the field.
As with all photography, matching the subject to the technique is important. Simple, colorful subjects tend to work best.
2. PANTASTIC PANNING
Here’s a refresher. Panning is the main technique of conveying motion in a still photograph. It does so by revealing the moving subject fairly sharp and all unmoving areas as blurred. How does it work? You sweep your camera in sync with a moving subject like a bicyclist so that it stays relatively in the same place on the sensor keeping it fairly sharp, while stationary areas are blurred because of the camera movement.

If you want to add predictability to your panning so you consistently create sharp subjects with blurred backgrounds, here’s how. Use a shutter speed that’s about two to three times as fast as your subject (for example, set your DSLR to 1/30 to 1/60 sec in manual or Tv mode for a bicyclist) and be sure to sync the camera motion to the subject motion and pan as smoothly as possible. The indication that you are successful is that numbers, words, and logos on uniforms and equipment are clearly legible.

Now here’s how to make your results unpredictable, abstract, often unusable, but occasionally supremely impressionistic. Use slow shutter speeds (anywhere from 1/2 to 1/8 second), pan with an occasional (or frequent) bump in the motion, use a different perspective, and don’t just pan subjects crossing directly in front of you. And don’t hesitate to attempt rear curtain flash—it’s a simple camera setting that can add a dash of sharpness amidst all that crazy blur.
How do you know when you’re successful? When you like the results.
3. DANCE WITH YOUR CAMERA
At the risk of revealing my salt and pepper hair (or lack thereof), photo folks used to remark on their good fortune when a mistake turned into a good photo as kicking the tripod.

My alternative to kicking the tripod is dancing with the camera. That means I like to purposefully move it to create blurry pictures of still subjects. Needless to say, this can be a risky venture as it tends to result in abstract or impressionistic photos, whose appeal depends largely on your tastes.
But it is great fun.
Subjects that work well for this tend to be colorful or have well defined shapes that can reveal themselves even through a dancing camera’s motion effects. I’ve had best results with large patches of flowers and a DSLR equipped with a macro lens. A neighbor’s spring poppy patch excels.

This totally experimental technique means you need to try a variety of shutter speed and camera motion combinations. I tend to opt for shutter speeds between 1/4 and 1/20 second. With practice you may be able to learn to pause briefly at the start of the exposure so the subject’s shape register enough to make it a bit recognizable amidst the swirls caused by the ensuing camera motion. By using a tripod, you can make the blur movement more consistent in its direction.
You can take this to another level by being in motion yourself as you take the picture. For instance, you could be walking behind somebody or running beside a child and photograph them as you are both moving. When you’re in full motion, you may want to try a bit faster shutter speed, say 1/10 to 1/60 second, depending on how fast you’re moving.
4. CAMERA STILL, SUBJECT MOVING
You have to balance subject blur with attractiveness and recognition. If the subject is so blurred you don’t recognize it, then the picture may fail. The exception is when you have managed to make it attractive because the blur has become impressionistic or otherwise compelling. For instance, you could create a very appealing blur of a pirouetting ballerina or spinning ice skater. People at work or play may be moving only a part of their body, so if you can find a shutter speed that reveals overall body sharpness but blurs the hands or feet, you can animate the photo with the person’s activity. Fiddlers, pianists, drummers, sculptors, painters, jugglers, and bakers all create a flurry of motion with their hands.

The approach is fairly simple. You hold your DSLR still (mount it on a tripod for slow shutter speeds) so that non-moving picture parts appear sharp, then use a shutter speed slow enough to slightly or moderately blur the subject. Since choosing the shutter speed is critical, as with nearly all motion techniques, you’ll have to experiment to find the approximate shutter speed that yields the results you want.

For flowers dancing in the wind, you might use a shutter speed of 1/2 to 1/8 second. For a BMX biker performing mid-air stunts, you could try 1/60 to 1/250 second. For a musician or artist, 1/15 to 1/60 second might work.

The world around you jumps, runs, and turns, so now you know how to reveal the activity of life in a still photograph.
I’ve saved the best (or at least, the most controversial) for last…
5. TOSS YOUR CAMERA
Yep, throwing the camera into the air and letting it take the picture untouched by human hands is catching on. No, this is not a ploy by Adorama to boost camera sales (although maybe Adorama should come up with a special camera catching mit).

There are two approaches. If you use a long shutter speed you toss the camera as you press the shutter button. For the faster shutter speeds needed for daylight pictures set the camera’s self timer to a second or two, activate it, and then just before the shutter releases toss the camera and let it take a picture while tumbling through its ascent or descent.

You might think the technique is to throw it high in the air as if you’re playing catch. You can do that, especially if you like to take self portraits. However, you can also gently toss it from one hand one to the other—the technique I favor. The only requirement is that the camera be in mid air when it takes the picture.

A large segment of the toss practitioners photograph lights, even images on monitors created specifically for the tossing. Some of the results are exquisite patterns. Whatever method you follow, know that it requires practice; you may learn to spin the camera to add some nice swirls.
Obviously this is a somewhat chancy technique, as regards the camera, the picture results, and the safety of bystanders. To see experts in the technique, visit the tossing group on flickr.com. Here are a few guidelines whose helpfulness is admittedly dubious (as the technique well may be but it sounds like fun so…):

- Use a camera whose destruction won’t leave you weeping
- Should you be an energetic tosser, clear all loved ones from the launch area
- Invite a local politician to catch the camera
- Choose an environment with some interesting features on the ground and up in the air
- For daylight shooting, start out with a shutter speed of 1/500 or 1/1000 second in shutter priority mode to try and stop the blur from the spinning camera. Then try some slower shutter speeds for that creative blur.
- Practice catching a can of tomato soup for a few days, or maybe your old film SLR.
- Either hand out hard hats or do it in an area where you’re the only person beneath the falling camera (yell “fore” when you release the camera).
- If you disregard the safety rules and an innocent passerby is struck, shout “Tourists shouldn’t be allowed to take pictures from plane windows” and run
And good luck–you’ll need it.

