Until late 2004, Adobe® Photoshop® Elements 2.0 was one of the most popular digital image editing programs. The program, included free with many digital cameras and accessories, including some Wacom tablets, and costing under $100 if purchased separately, was powerful and easy to use.
Enter Elements 3.0. The new program includes new tools and features that even a pro like myself would find useful. It even provides some features not found in Adobe® Photoshop© CS.
Let’s take a look at the tools and features for image editing in this program, or to state it more accurately, programs. Why the plural? Because there are actually two versions of Elements 3.0, one for Mac and one for Windows. The main difference between them is that the Windows version offers an image sorting and filing system that is not in the Mac version. But we Mac owners can handle that sort of stuff with iPhoto.
Okay, let’s get going.
 New front end. The first thing that’s different about Elements 3.0 is that the interface (opening window) looks very different from that of Elements 2. Basically, you can choose to make adjustments from either Standard Edit or Quick Fix. Here’s a look at the Standard Edit dialog window. For more serious work and for more control, Standard Edit is the way to go. Although its features may be in different places, they function the same way they do in Elements 2.
 Quick Fix. The Quick Fix window offers (surprise, surprise) a quick fix for images using sliders. If you are in a hurry to make an adjustment, check out Quick Fix.
In both of these windows you’ll notice that the working image is displayed in a Photo Bin, another new addition to Elements 3.0. When working on several images at one time, each image is displayed in the Photo Bin. Clicking on an image gives you instant access to it.
 New tools and a redesigned Tool Bar.
Two new tools have been added to the redesigned Tool Bar, the Cookie Cutter Tool and two Healing Brush Tools, Spot Healing and Healing Brush. Both tools work like the Clone Stamp tool in Elements 2. They are useful for healing (fixing) blemishes and marks on a subject’s face. The Spot Healing Brush Tool is a one-click tool (just click over a spot with a brush that is larger than the spot), and the Healing Brush Tool works like the Clone Stamp Tool (you pick up one appropriately toned area from the subject and paste it over the area to be fixed.)
 Spot Healing Brush. Here’s an example of how I used the Spot Healing Brush Tool to remove a few blemishes from this monk’s face.
 Cookie Cutter Tool. You’ll find many different shapes (hearts, dogs, cats, butterflies and so on) in the Cookie Cutter Tool that we can use to frame objects in a photograph. Personally, I think some of the “cookies” are a bit silly. But, there are very cool features of the Cookie Cutter Tool too, such as the many digital frames you can use to artistically frame a photograph. Here I dressed up a picture of a jaguar using one of the frames.
Let’s move on to some new features in the Menu Bar.
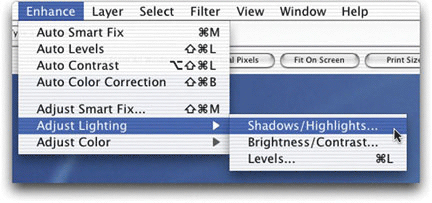
Shadow/Highlight Control. Under Enhance we find Adjust Lighting and another new feature, Shadow/Highlight.
By clicking and moving the Shadow and Highlight sliders, you can individually control, you guessed it, the shadows and highlights of the scene. In the Shadow/Highlight dialog box there is also a slider to control Midtone Contrast. Sure, Levels (and Curves in CS) offers more precise control over shadows and highlights, especially when you’re working on adjustment layers and selectively erasing areas of an image. But, the Shadow/Highlight control makes the process easier.
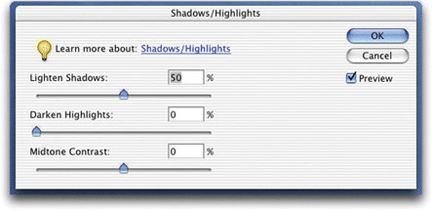
In this example, I lightened the shadow area (green leaves) without brightening the white flower.
Now let’s take a look at two new filters.
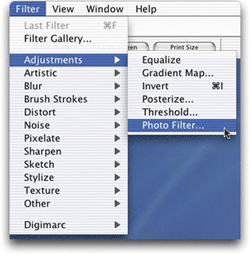
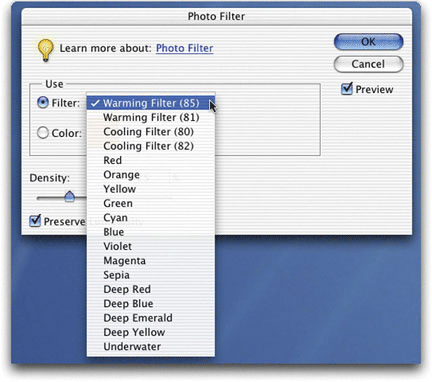
Photo Filter. When you go to Filter Adjustments, you’ll find that a filter from Photoshop CS, Photo Filter, is now included in Elements 3.0. At the click of a mouse (or tap of a WACOM stylus), you can add one of 18 photo filters to a picture. Warming, cooling, sepia, red, yellow and green are just a few of the digital filters, all of which can be applied to an image in different densities via the Density slider.

Now let’s take a look at how just two of the filters affected one of my photographs of Bryce Canyon. In the center shot, I used the Warming Filter 85 filter to warm up the picture, simulating the light of late afternoon or early morning. In the photo on the right I used the Cooling Filter 80 to cool off my picture, creating the impression that the photograph was taken by moonlight.

Reduce Noise. Digital noise (the equivalent of grain in film) shows up more prominently in shadow areas, especially at higher ISO settings. It’s also more evident in images taken with low and mid-range digital cameras. In this picture of a cowgirl, I wanted to remove the noise from the darker area in the background.
 Once the Digital Noise dialog box is opened, you have access to three settings for reducing the digital noise in a digital file, Strength, Preserve Detail and Reduce Color Noise. Due to display limitations, you may not be able to see how effectively this filter works in these before-and-after screen shots. However, when making inkjet prints, I am confident you’ll be able to see the benefits of this way cool tool.
Layers Palette. Well, what goes down must go up, I guess. In the Elements 2.0 Layers Palette, you drag down to create a new layer, put a layer in the trash and so on. In the Elements 3.0 Layers Palette, you drag up. Oh well, I guess the folks at Adobe felt users needed a bit more exercise when working in Layers.
That’s a quick look at the new features of Elements 3.0. If you have this version of Elements, play around with the tools, enhancements, and filters so you can become familiar with the creative possibilities.
![]()
Rick Sammon is the author of The Complete Guide to Digital Photography, published by W.W. Norton. He also recently completed two interactive CDs, Photoshop for the Outdoor, and Travel Photographer and Photoshop Makeovers, distributed by Software Cinema. For information, please go to www.ricksammon.com
