I obey the speed limit, I recycle my trash, I don’t run with scissors. But when it comes to photography, that’s another story.
I revel in breaking the rules.
Photography’s rules and guidelines help us make good pictures, but the “correct” way is not always the most eye-catching way. Once in a while, it’s fun to purposely defy those rules. You may be rewarded with exciting, creative photographs.
So welcome to my wild and wonderful world of special effects. Here are some cool in-camera special effects, and the comparable Photoshop methods–-if there are any. Which approach is better, faster, more convenient, or more fun? You decide which suits you best.
One rule that’s been drilled into us is that we must use a tripod when shooting at slow shutter speeds. That’s a perfectly valid concept if you want to prevent blur. But sometimes blur is just the ticket for making a photograph sing. Blur can be good.
Toss that tripod!
You’ve probably seen how a slow shutter speed can turn flowing water into a lovely, misty veil, or how you can intensify the impression of motion by using a shutter speed slightly slower than the one needed to keep a moving subject sharp. But both of these techniques need a tripod to keep the rest of the picture sharp.
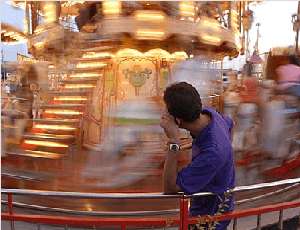
Now how about getting bold and taking the camera off the tripod? Move the camera as the shutter fires and you can produce some WOW images. You may get stares from “knowledgeable” photographers, who’ll think you’re slightly weird. But don’t pay attention to them– they don’t know how clever you are.
Clarity about blur
There are some basics you’ll need to know about before embarking on any of these blurry techniques. How about that? No-rules blurry photography needs some rules! I’ll just call them helpful hints.
For starters, you’ll need a camera that lets you set the shutter speed yourself. If your camera is completely automatic, it may have a Landscape mode, which may or may not set a sufficiently slow exposure time. Another thing, use a slow film (ISO 100 or less) so you don’t overexpose the picture, or set your digital camera to its slowest ISO equivalent,
Rehearse your movements. You’ll want to be sure the subject will stay within the frame and that no unwanted objects sneak into the frame. Rehearsal is especially important with an SLR camera since you won’t be able to see the scene while the shutter is open.
Very important: Start moving the camera before you press the shutter release, and continue the movement after the shutter closes. This will prevent a jerk at the start and/or end of the exposure—presuming you want to achieve a smooth blur, which generally looks better than a discontinuous one.
Try several different shutter speeds and rates of movement. Too little movement and the results will look like a mistake; too much, and all detail will be lost. Undoubtedly, there will be some pictures you’ll really love and some you’ll delete or toss into the wastebasket. Keep notes about what you’ve done, so later on you’ll know what worked and what didn’t. You’ll appreciate this reference when you try the same effect at another time. Digital cameras do have the advantage of giving you immediate feedback, and the metadata keeps track of the shutter speeds you used.
Move the camera vertically
Ahhh, tall trees soaring skyward! You can enhance (or should I say “heighten”?) the feeling of loftiness by moving the camera vertically during the exposure. It’s an impressive way to photograph slender, vertical subjects, such as trees, tall grasses, and skyscrapers. Try shutter speeds ranging from one-half to one second. You’ll get a slightly different effect if you move the camera downward rather than upward, so try it both ways.
In Photoshop: Go to Filter>Blur>Motion Blur. Set the Angle to 90 degrees and play around with the distance setting until you get streaks you like. Not too little, which will look like a mistake, not too much, which will give you mush. You might begin with a distance setting of around 400 pixels for thick tree trunks, 250 for more slender things. The advantage is you can immediately see the result as you change the distance setting.
Move the camera horizontally
Suppose your slow-footed friend wants you to make a picture that portrays him as a marathon runner. You’ll be a hero if you photograph him while panning the camera, in other words moving it horizontally to track the action.
The idea is to move the camera at the same rate of speed and in the same direction as your moving subject. This will add speed-indicating streaks to the background while keeping the subject relatively sharp. The crucial aspect of the technique is to synchronize your camera movement with that of the moving subject.
You can use a shutter speed of one-half second to 1/30 sec or even faster– it all depends on how fast the subject is moving and how close it is to the camera. The farther away the subject is, the slower your shutter speed will have to be. Panning does take a bit of practice, but here are a few hints to help guarantee your success:
- Choose a background with lots of detail– that’s what produces the streaks. (See, we’re breaking that familiar rule of simplifying a busy background!)
- Make sure there is good contrast between the subject and background.
- Place your feet so one foot is pointed forward and the other is at an angle, pointed roughly in the direction of the end of your pan.
- Move your entire upper body during the pan, not just your head and hands. In other words, twist from your waist, not from your neck.
What if the subject is moving vertically, such as someone parachuting out of an airplane? I knew you’d ask. Sure, you could pan the camera vertically, but don’t forget about needing a busy background. No detail, no streaks. Wait until the skyline or foliage is behind your subject before you start panning.
Does that mean no streaks, no terrific effect? Let me amend that statement. If your camera movement is not quite in sync with the subject’s rate of movement, it will produce slight streaks in the subject itself, which does lend some sense of motion.
Surely, he jousts: When people or animals are running, their arms and legs may be moving in different directions from their bodies. So even if your camera movement is perfectly in sync with the moving subject, there will be blur in those arms and legs. Or the limbs may almost disappear, as happened to the horse’s legs in my photograph of the medieval jouster.
In Photoshop: Open your image and, using whatever Selection tool you like, draw a selection outline around the subject. Feather the selection about 3 pixels. Invert the selection. Now you’ll be able to modify the background without affecting the subject. Click Filter>Blur> Motion Blur. Set the direction of your streaks to an angle of 0 degrees. Play with the distance slider until you see streaks you like.
Move the camera diagonally
Moving the camera diagonally adds a rather painterly look to your pictures, which is especially nice with flowers. Or you can create your own hurricane if you do it when shooting tall trees.
In Photoshop. Open your image, then go to Filter>Blur>Motion Blur. Set the angle to about 45 degrees, but any angle between horizontal and vertical will also be good; use whatever appeals to you.
Move the camera in an arc
When you’re standing in front of a colorful bed of flowers, here’s a technique to go crazy with. People will certainly stare at you, but you’ll delight yourself with images filled with swirls of color like a Van Gogh painting. The more colorful the subject, the better. Fill the viewfinder with the subject, then rotate your arms in a large arc, as I did with the picture of the red and yellow flowers. Or move your hands in a small arc to get delicate, curving lines. Or, when the trees are ablaze with brilliantly colored fall leaves, stand under a tree, point the camera upward, and twirl yourself around.
In Photoshop: The Photoshop method is easy, but not as much fun. Open your image, click on Filter>Blur>Radial Blur. Choose Spin as the blur method. Set the Amount to around 25, but try different amounts. You can also use the Move tool to change where the center of the circles will be.
Write with your camera
Speaking of circles, try using your camera sort of like a pen. That is, use a small movement as if you were drawing a little circle–the letter “O.” That’s how I made the photograph of the bridge, turning its points of light into spirals. Or move the camera as if you were writing a series of Ws, Vs, or making a series of loops. Do it with fall leaves, a bed of flowers, or a group of other small objects.
In Photoshop: The camera wins. There’s no easy way, if any, to do this in the computer. If you know how, hey, write me at elinor@att.net.
Random movements
While you’re at it, move the camera in any way you can think of. One wild method is to put the camera on a tripod and gently kick the tripod! That can jiggle the camera enough to produce some interesting results. But keep your hands close to the tripod to prevent it from toppling over if you go about this too enthusiastically.
In Photoshop: Again, you can do many wonderfully crazy things in Photoshop, but this is not one of them.
Macro blur
Finally, moving the camera slightly in any direction– or even in a combination of directions– adds an abstract quality to a close-up photo of practically any subject. Use just a slight amount of camera movement with a shutter speed of about 1/60 sec or 1/30 sec. Trial and error and an adventurous sprit is the name of the game in this and all aspects of blur photography, so get out there and move that camera around!


