Clean-up time.
Let’s say you didn’t follow Bob Atkins’ must-read advice on how to clean dust off your digital SLR’s sensor–or you didn’t know about it–and that amazing shot of yours is pockmarked with dust spots. What do you do now?
Even if you clean your sensor regularly, you can’t totally avoid dust spots. Sooner or later, you’ll find spots on your images after it’s too late. Spots can crop up suddenly, seemingly out of nowhere, at the worst times. And they can jump around between the sensor and the chamber walls, so you can have a now-you-see-it-now-you-don’t scenario. And finding the spots before they show up on a print is a major challenge.
Photoshop, as usual to the rescue!
I’m using Photoshop CS2 here. You can use a different image editor for the very basic things I’ll show you here. You’ll only need one that has a cloning tool and a Levels adjustment. Of course, menus will be different in different programs and versions, and I’m speaking Windows here–if you use a Mac substitute Cmd for Ctrl and Option for Alt.
How to spot spots
Finding sensor spots on an image can be tricky. They’re usually subtle smudges which are most visible in featureless areas such as skies and are more visible in images shot at high apertures (see Bob Atkins’ story for details).
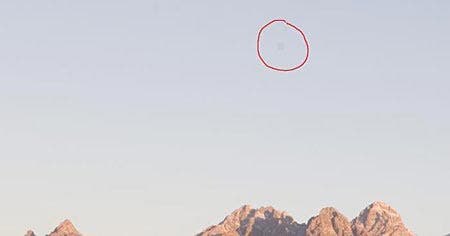
Increasing image contrast makes spots more visible. Look at the image I used in a previous tutorial, The Pitfall in Darkening a Sky, Part 2. When I darkened the sky and increased its contrast very heavily to illustrate a problem with making such an adjustment, I discovered sensor spots I hadn’t noticed on the image before. Here is part of the sky before I increased the contrast. I can only see one faint spot.
Now look at what happened when I darkened the sky, using a Levels adjustment layer, below.
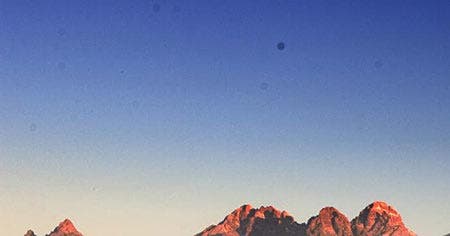
This is really ugly. I’m embarrassed to show how lax I had been in not checking and cleaning the sensor for several days. Even for an image in which I won’t be increasing the contrast of a sky or other featureless area, I would like to see any spots well enough to clean them digitally, since spots I didn’t notice might show up on printing.
Making spots obvious
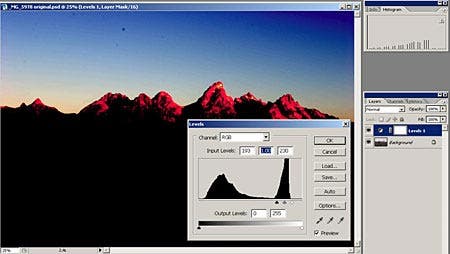
The adjustment I made on this image shows us a tool to see such spots: making a temporary Levels layer and punching up the contrast. Go to the top menu bar and click on Layer > New Adjustment Layer > Levels. Click on the two end sliders under the histogram and drag them toward the center until the contrast of the clear area is strongly increased, as shown below.
Don’t use Levels to increase contrast for real image fixes, because that pushes the lightest and darkest areas to pure white and black, and the image will look terrible. But that sledge-hammer approach is fine here–we just want to punch up the contrast in the light to mid-toned featureless areas to better see spots.
When there is a gradient in the sky, as here, you may have to set the Levels sliders to one position to see the spots in the lighter part of the sky, then move them to another position to see the spots in the darker parts of the sky.
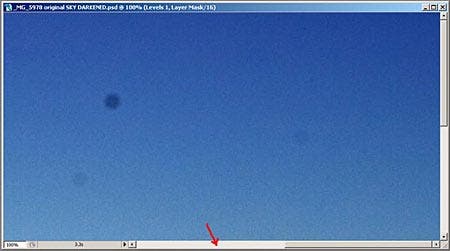
Now, zoom in 100 percent and scan through the image, looking for spots. To scan through the image, you can jump vertically one screen by using the Page Up and Page Down keys on the keyboard. To move one screen horizontally, you can use Ctrl-Page Up or Ctrl-Page Down, or click in the empty space beside the left-right scroll bar along the bottom of the image, as shown by the arrow below.
How to see the spots even better
But there is a better way to make the spots really visible. If you grab either the horizontal or vertical scroll bar and slide it, spots you hardly noticed when they were still will jump out at you as they move. I like to use Page Up and Page Down for vertical movement and slide the scroll bar for horizontal movement. That way I can be sure I didn’t miss any areas.
Heal thyself
After you can see the spots, getting rid of them is easy, via the Clone Stamp tool, or the Spot Healing Brush in Photoshop CS2 or Elements 3 and 4. Make sure you are working on the Background layer (i.e. make sure it is the active layer.)
The Spot Healing Brush is a dream to use because you don’t have to choose an area to sample from, as you do with the Clone tool. Just click on the spot (with a large enough brush) and it will disappear. This tool is absolutely magic.
However, the Spot Healing Brush won’t work near the edge of a feature, such as the mountains, because it picks up its matching information from the area surrounding the spot. Close to the mountains you will need to use the Clone tool.
Send in the clones
If you use the Clone tool, there is a pitfall to be aware of. If you have adjustment layers turned on, as you do here, look on the toolbar along the top edge of the screen and make sure Sample All Layers is NOT checked. If it is, the tool will pick up the adjusted color/tone from these layers and add it to the cloned spot, and the result won’t match the surrounding background.
If you are using the Clone tool and the sky has a gradient of tones, you need to choose your sample point carefully; it must be from an area of the same darkness/lightness. Use the smallest brush practical, and one that is neither too soft- nor too hard-edged. This is because the partially transparent areas near the edges of a soft brush will average out any texture from noise or film grain and look artificial, and a hard edge will show if there is the smallest difference in tone or texture between the sample point and the cloned point. I can’t tell you what size to make it–that depends on your image size in pixels. With a little experience, you will learn to see it.
After the spots are cleaned up, delete the high-contrast Levels layer. Done!
Next time: What is a histogram, and what you should never do to one.