Turn your photos into paintings? Corel Painter—plus a Wacom tablet—offers endless possibilities.
I am always interested in taking my photographs beyond the ordinary. The techniques that appeal to me the most are those that render a soft, dreamy look such as shallow depth of field, the focus distortion of a Lensbaby, multiple exposures (including the Orton effect), photomontages, and using camera swipes to turn ordinary objects into softly abstract forms. But I have recently made a quantum jump by starting to learn Corel Painter. This is a program I am truly excited about.
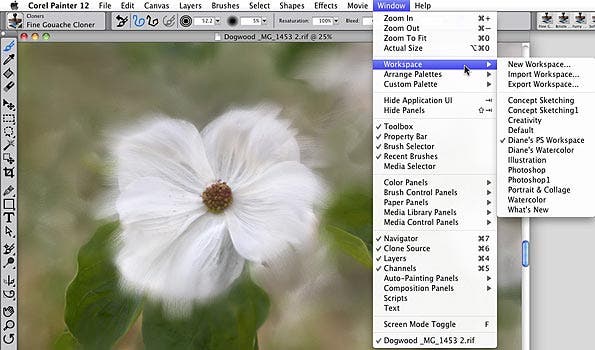
Here’s a painting of some Dogwood blossoms:

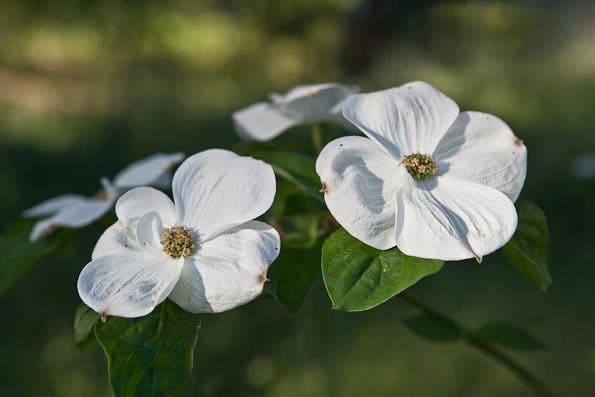
And here’s the starting photograph:

I had tried Painter several years ago and never quite connected with it, which I attributed to being too busy. But recently one of my friends said I should give it another try, as the recently released version 12 was much improved. I have, and for whatever reason I’ve now fallen in love with it! And I’ve discovered many other photographers have, too.
Here’s an egret from Lake Martin, LA:

And here’s the painting:

Painter has a strong appeal for photographers because you can “clone paint” using a photograph as the source. As shown in the above image, you can crop and enlarge a small portion of an image because sharpness isn’t critical, and you can clone out things in a way that may not be perfect because minor flaws will be covered up by the brush strokes in the painting.
Hardware issues: Wacom Tablet Required
Getting started with Painter is very easy and you can learn the complexities as you go. But before going any further, let me stress that you won’t be able to realize the potential of the program or exert much control over the brushes with a mouse or trackball. You need a Wacom tablet. The cheapest model, the Bamboo, isn’t adequate; you’ll want an Intuos. The newest models are more sophisticated but if you have an older one it will be fine.
There is a range of tablet sizes but I prefer the smallest one so I can cover the screen area with a flick of the wrist. The Wacom is different from a mouse; it uses a stylus that you hold like a pen (natural for drawing or painting) and the surface of the tablet maps to the screen, so you don’t have to keep picking the pen up as you do a mouse to reposition the cursor. Place the tablet in a comfortable position such as you would use for writing, with your forearm level. I keep mine on a stool beside my chair, at waist height. I love the control I have with it; I use it for everything, in every program. I haven’t used a mouse in years.
Check the Corel web site for compatibility of Painter 12 with older computers.
Getting started
Installation is easy, but downloading the extra workspaces requires a separate step that you can access in the introductory screen the first time you start the program. There is a workspace for photographers similar to Photoshop’s and you can customize your own preferred layout.

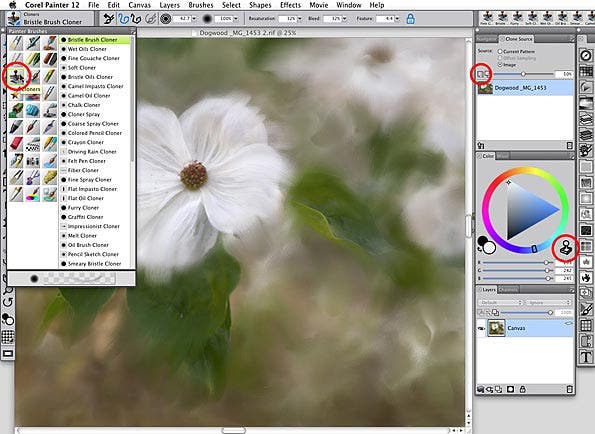
Open a photograph in Painter (File > Open) and go to File > Quick Clone. The picture will be screened back with a “tracing paper” overlay on which you will paint. The opacity of the original source image can be controlled with a slider in the top panel on the right of the screen shown below. You will need to turn it way down in order to see your painting accurately. You can toggle it on and off with the symbol to the far left of the slider, circled in red below.

Brushes
There are many types of brushes, and variants under each type. To begin exploring the program, click on the set of cloner brushes (circled in red on the left side of the figure above) and choose a brush from the list. Set its properties (Size, Opacity, Resaturation, Bleed and Feature) on the bar above the image area and start painting. (More about those last three brush properties later.)
Make sure the large color wheel on the right side of the screen is shown in gray, otherwise you will be painting with the selected color instead of cloning. (You can do both, in the same painting.) If the wheel is in color, as shown here, just click the clone icon, circled in red above. (Any brush can be a cloner; the set of cloner brushes is just a convenient start.)
I like to turn the opacity of the source image way down so I can see my brush strokes better. In the figure above, the soft white detail in the lower right was a complete surprise, which I love. I have no idea where it came from. If I had been using too high an opacity for the source image I wouldn’t have been able to see it clearly and I might have painted over those strokes.
You can let Painter get a feel for the pressure you like to use on the tablet by going to Preferences > Brush Tracking and sketching a few strokes with a brush. I do this for each new brush I use and its behavior will then be biased toward my preferred pressure.
First steps in a painting
Although everyone will develop a unique style, here’s the approach that worked for me to get started. (There are about 1,000 others.) I choose the top brush in the Cloner set, the Bristle Brush Cloner, and set a size that lets me trace coarsely over the features of the picture to block in an underpainting. If I set it too small it would take too many brush strokes to cover the canvas. For the image above, my initial brush size was a little larger than the dark center of the dogwood flower. (As with Photoshop, the square brackets toggle the brush size and you can set the size increment in the Preferences; the default is 1 but I find an increment of 10 is much more convenient.)
The beauty of clone painting is that I can subsequently change the blocked-in brush strokes in parts of the image, to make them different or to more closely bring out the original photograph. So I’d like the initial brush strokes to create the most abstract parts of the image, much of which I will leave in place. I usually set the brush Opacity to 100 percent to start with. I try a few test strokes with the defaults for the brush and then experiment with modifications. You can reset the brush defaults by clicking the Reset Tool on the far left of the Properties bar, which is just above the image area. You can zoom into the image for detail work with small brushes.
The Size and Opacity of the brush are obvious. Feature will make the bristles appear to be more or less densely spaced.
Resaturation is something I often change as I paint. A lower Resaturation value causes the color picked up under the brush when you start a stroke to be carried out further before it fades. A high value will cause more of the underlying features to be revealed. But Bleed and Resaturation are tied together. When both are low (less than 10 percent, with Bleed lower than Resaturation) a brushstroke will be somewhat translucent as it drags out.
And conversely, the behavior of Bleed depends on the Resaturation value. Basically it controls how much the colors underlying a stroke are smeared. If it is higher than the Resaturation value, there is more bleeding of underlying colors up through the brush stroke, and you don’t paint with full opacity.
My response to this is to let the intuitive right side of my brain deal with it. The right hemisphere is more capable than the left hemisphere would like you to believe.
Bringing back detail
After an underpainting is established, I go to a smaller brush with slower strokes (and tweaks to the properties) to begin to bring back detail from the source. The results vary with the speed of the stroke and the surprises can be a lovely touch. The Fine Gouache Cloner brings back original detail, so sharply that I generally use it at low opacity. Don’t go for too much detail; be loose and free and let brush strokes show, or you will just wind up with a slightly soft version of your photograph.
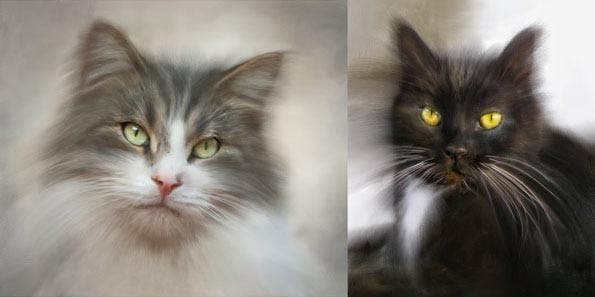
Dragging out brush strokes is a great way to do cats:

There are many layers of Undo (you can set the number in the Preferences) but you can also undo by choosing a different brush and painting back over an area to get a different look.
You can add some enhancements using the Effects menu. You can add lighting effects that make brush strokes look three-dimensional and you can add textures similar to papers or canvas. You can also work in layers, for instance making a new layer for some brush strokes that you may subsequently want to modify.
Keeping the paint wet
If a Painter file is saved correctly, the paint never dries! You can save a painting in Painter’s native RIFF format and pick it up later where you left off. But it will need to reference the original source photograph so don’t change its location or crop it. If you need to do further work on the source file, do so on a copy.
In the Save dialog there is a check box for Append File Extension. It is unchecked by default but I prefer to check it because sometimes I want to know what sort of file I’m looking at using the operating system’s Windows Explorer or Finder (Mac). There is also a checkbox for Embed Profile, and this is highly recommended if you are using any sort of color management in Photoshop. And using color management is highly recommended. If you haven’t gotten into it yet, check out my recent tutorial on color management, and the two previous tutorials it references.
Going beyond Painter
You can make basic tonal adjustments in Painter using the Effects menu, but I find many advantages to going into Photoshop with a “finished” painting, saved as a TIFF. I like to enhance a painting using Nik Color Efex Pro’s Tonal Contrast and Pro Contrast and some of the Topaz filters, and I will usually do some touchup work in Photoshop, including cloning.
Interfacing with Lightroom
One thing I hope will be improved in later versions of Painter and Lightroom is that the two don’t interface well. I can set up Painter as an external editor in the Lightroom Preferences, so I can go to Photo > Edit In and Choose Corel Painter, but the convenience ends there. If the source image is a RAW file it opens without issue, but if it is a 16 bit Photoshop file I need to open it first and convert it to 8 bits. I normally save Photoshop files in 16 bits but Painter only works with 8 bit files. But this is just a minor inconvenience.
The first item on my please-fix-it list is file naming. When I save a painting, the name of the source photograph isn’t suggested as a default; if I want to preserve some reference to the original image file in the name, I have to type it in from scratch. In most cases I would like to save a painting as a RIFF file and then save it as a TIFF file and append “Painting” to its name. Having to type in the full name isn’t a major problem but it is a nuisance.
The folder for the source image is also not shown in the Save dialog, at least on my Mac system. If I want to save the Painter files (both a RIFF and a TIFF) in the same folder as the source image, I need to make note of the folder (from which I just opened the file) and navigate to it in the Save dialog.
Then when I get the files in the desired folder, Lightroom doesn’t know about them. I have to go to the Library module and then to Library > Synchronize Folder, but it only recognizes the TIFF file. The RIFF is ignored.
More importantly, the metadata is stripped out of the Painter RIFF and TIFF files. If I go to a folder in Lightroom where I have saved a Painter TIFF, when I sort by capture time the Painter TIFF won’t appear next to the source file because there is no metadata for Lightroom to know the capture time. It will instead appear as the last item in the filmstrip. I can get around this by naming the Painter file starting with the same name as the source file, and then sort by Name in the Lightroom folder and see them together. But if the source was a RAW file, I prefer to name it with a descriptive prefix and leave the original RAW filename after. So I am having some frustration managing my Painter files as I would prefer.
One reason I persist with a less-than-simple workflow is that, once I have gotten the TIFF file of a painting back in Lightroom in the same folder as the source image, I can keyword it as Corel Painter and then I can find all of my paintings with a single click (on the arrow to the right of that keyword in the Keyword panel). My Painter files are scattered over several hard drives and many folders, but I can see them all at once, as though they were in the same folder. And I can go to the parent folder of any one with a single click (in the Metadata panel) to check for related images or further information on the source, or whatever.
Resources
When I was using Painter several years ago, I found a helpful book by Martin Addison. There is an updated version coming out in November, “Painter 12 for Photographers.” Another recommended book is “Painter 11 Creativity” by Jeremy Sutton.
You can download a fully functional 30-day demo, and you can find video tutorials at www.corel.com. The full price for Painter 12 is $429 and an upgrade from the full version of Painter X or XI (10 or 11) is $229 .

