I was shooting at a wetlands area at sunrise–a target-rich environment–with my Canon 20D and Sigma f/4.5 500mm lens. The full moon was about an hour away from setting. Wouldn’t it be great if I could get a shot of birds flying in front of the moon?
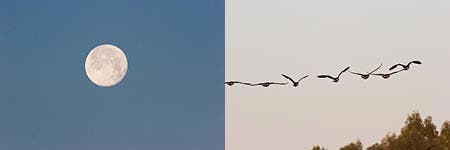
Well, it didn’t happen, but that’s OK: the moon would have been out of focus if I had focused on the bird. The kind of scene I wanted cried out for a digital sandwich!So, I shot the moon by itself and back in my “dimroom” I chose a shot of flying geese that I thought would make an interesting “slide sandwich” with the moon. But I’m grateful the photos aren’t slides, because I can do it better digitally, using Blending modes. Let me show you how. First, a note about the software: I use Photoshop CS2, but earlier versions of Photoshop and Photoshop Elements will work, as will many other image editing programs. Of course in other programs the names of tools and menu items will be different. If you don’t know where to find them, don’t be discouraged–you can look them up in the Help section.These are the starting images:
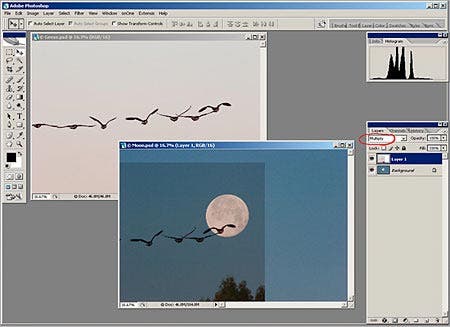
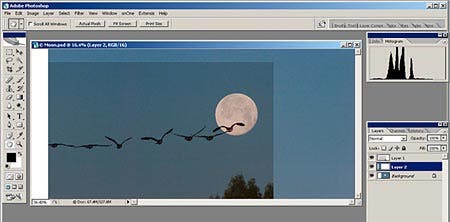
I opened both of these shots and chose the Move tool and clicked inside the frame of the geese shot, holding down the mouse button while I dragged the cursor into the frame of the moon image. This copied the geese image as a new layer on top of the Background layer of the moon image–you can see this in the Layers Palette on the right side of the screen shown below. To get the slide sandwich effect, I went to the top of the Layers Palette and changed the Mode of the geese layer from Normal to Multiply. (Click on the arrow on the right of the window that says Normal–see the red circle in the figure below–and you will see a list of choices.) Since I had a light background on the top layer I needed to use one of the Modes grouped near Multiply that uses the pixels on this layer to darken the background layer below it. With different images another Mode may give better results. If the blended image is a little too dark or light you can fine-tune that later. Don’t just rely on a full-screen view of the image; zoom in to 100 percent by double-clicking the Zoom tool (the one that looks like a magnifying glass) to have a close look at how the different blend modes look.
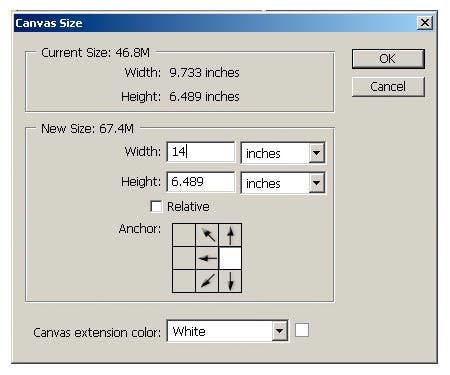
I was through with the geese image, so I closed it. On the composite image I dragged the geese layer with the Move tool until I liked the way the geese lined up with the moon. The geese looked best when I moved their layer way to the left so they are just flying into the moon, but that means several of them are “lost” outside the current image frame. This is easily fixed by enlarging the canvas. I went to the top menu bar and clicked on Image > Canvas Size. I wanted to make the canvas wider, but only on the left edge. I guessed at a width and clicked in the box with 9 squares to tell it to add the canvas only on the left.
Now I needed to fill in the missing areas on both layers, where they do not overlap. I could have cloned in the missing areas, but since they are large and even in tone, it is better and easier to copy and paste. I did the background layer first. (I could have clicked the eyeball of the geese layer to turn it off since it’s not affected by this step.) I clicked the Background layer to make it the active layer, and then the Marquee Tool, choosing a rectangular marquee. (Hold the mouse pointer on the tool and several shape options will pop up.) I dragged the cursor on the left edge of the Background layer to select an area as close to the edge as possible and large enough to fill the expanded canvas, as shown below.  I hit Ctrl-C (Cmd-C for Mac) to copy this selection, then Ctrl-V to paste it onto a new layer just above the Background layer. (If it jumps out of alignment, click on the Move Tool and use the arrows on the keyboard to nudge it back.) Then I clicked on the Move Tool and dragged my new added area to the left, leaving a tiny bit of overlap with the Background. I held down the Shift key, which keeps it from moving up or down as long as you drag more or less horizontal. Even with such a flat-toned area, the darkness of the two edges did not match exactly, so I went back to the top menu bar and clicked on Edit > Transform > Flip Horizontal. Now I have a perfect match as shown in the figure below. In the Layers Palette you can see the new layer, the pasted-in addition to the sky, above the Background.
To simplify things I clicked the eyeball icon on the geese layer to hide it, clicked on the Background layer to make it the active layer, and did Layer > Merge Visible, to flatten the added area into the Background.
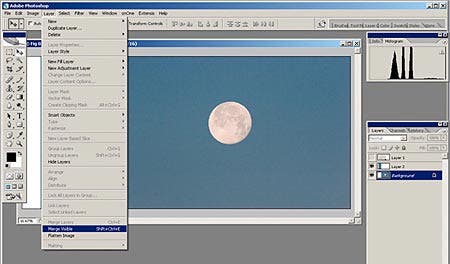
You can see the new merged Background layer in the Layers Palette in the figure below. I zoomed to 100 percent and checked the area near the junction to see if I needed to clone out any small irregularities where the symmetry would show. I felt the moon needed a bit more space on the right, so I needed to do the same thing to the geese layer. But if I left it in Multiply mode, this created a problem: If I left the layer in Multiply Mode, the new piece I pasted would be in Normal Mode and not be “transparent.” If I changed the pasted piece to Multiply Mode to match the geese layer I would get an interaction between it and the geese layer I didn’t want, because where they meet I want to leave a slight overlap. I didn’t want these layers “multiplying”–that would darken the overlap area and it would remain darker after I had merged the two layers. So I temporarily put the geese layer back in Normal Mode. I selected the Marquee Tool, did the same copy and paste (I caught a bit of a wing, which I will clone out later), moved the new layer, and flipped it horizontally. I turned off the Background layer, clicked on the geese layer and merged the two visible layers–the geese layer and its added piece of sky. Here’s what the image looked like just before I merged the two geese layers.
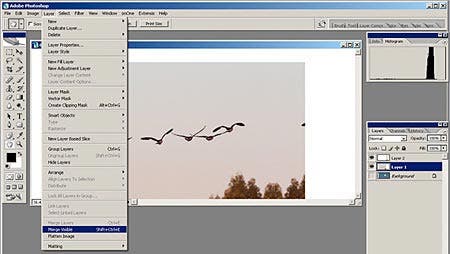
Now I turned the Background layer back on with the eyeball icon and put the geese layer back to Multiply Mode. I decided I was happy with the added areas, so I cropped the image to the dark area where both layers overlap. I decided I didn’t need all the area I filled in on the right, so I cropped in a little on that edge as well.
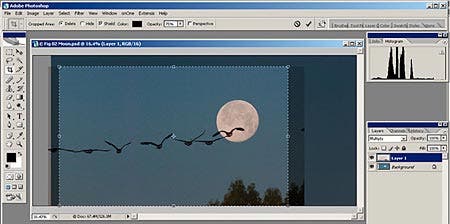
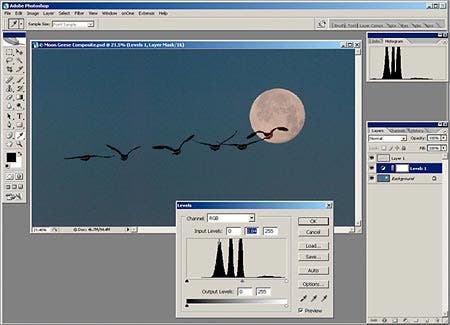
I clicked on the geese layer to make it active and cloned out the half-goose on the left and the trees. I always zoom in to a 100% view (by double-clicking the Magnifying Glass Tool) to clone. Then I wanted to see if I could improve the image by making adjustments to the brightness or contrast of the two layers. But I never use the Brightness and Contrast adjustments. They are very clumsy and have the potential to really damage the tonalities of an image — I use Levels or Curves instead. I clicked on the Background layer and made a Levels Adjustment Layer just above it by going to Layer > New Adjustment Layer > Levels. (You can also make an Adjustment Layer with the shortcut icon at the bottom of the Layers Palette–the half black/half white circle.) I experimented with adjustments to the darkness/lightness of the moon layer and made it a little darker to bring out detail in the moon. You do this in Levels using the three sliders directly under the histogram. I only needed a small movement of the middle slider, as shown in the figure below. Using the middle slider is more subtle than moving the left-hand slider, and you do want to be subtle. I didn’t move the left-hand slider because there are no dark tones in the image, and I didn’t want to artificially create any.
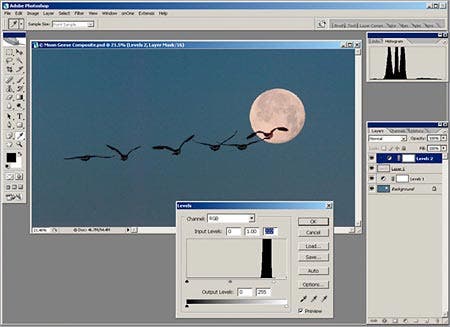
Making an adjustment to the geese layer needs an additional step shown below. If I make an Adjustment Layer above it, the adjustment would affect not just the geese layer but all the layers below it–both the geese and the moon layers. (This has nothing to do with Blending Modes–it is always the case.) I could have made adjustments affecting only the geese layer by making it active and using Levels directly, instead of making an adjustment layer. But be careful–if you make changes on the layer itself and then later decide to back off on them, you are doing some damage to the histogram–creating spikes and gaps. If you are careful to keep your changes small and don’t keep going back and forth, it won’t be serious, but there is a better way.In Photoshop this used to be called “grouping the adjustment layer to the image layer it affects,” and in Photoshop Elements it still is. In Photoshop CS, it is now called “creating a clipping mask.” It sounds intimidating but it is easy, and a powerful technique. You simply create the adjustment layer but hit OK before making any changes. In Photoshop CS go to the top menus and click on Layer > Create Clipping Mask. In Photoshop Elements go to Layer > Group With Previous. Presto! The new Adjustment Layer now affects only the geese layer. (You can see it is indented in the Layers Palette to indicate that.) Then I went back to that layer in the Layers Palette and clicked the icon just to the right of the eyeball, which brought back up the Levels adjustment dialog box. I moved the top right-hand slider left, to the start of tones as shown on the histogram. I turned the Background layer off by clicking on its eyeball icon to see the effect directly on the geese layer–it brightens the sky, which was dusky. Because of the interaction between the two layers this makes the sky brighter for the composite, offsetting my darkening adjustment, but also brightens the lighter tones of the moon. I try not to make adjustments that offset one another, but in this case the adjustments are to different layers and they are offsetting only because the two layers interact due to the Mode setting. There are other ways I could have adjusted the moon and sky separately, but this illustrates how to adjust the two layers independently, which is generally necessary in a sandwich or montage image.
I was done. Here is the final image and a zoomed view to show the realistic subtlety of the way the two layers interact.
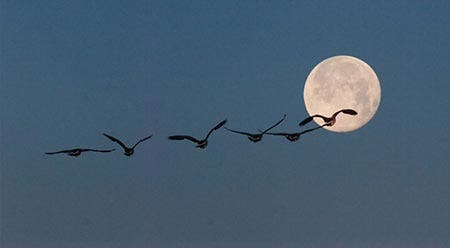
 Don’t you agree that the power you have in the digital darkroom beats sandwiching slides? Believe me — it took less time to do than it does to read about it. Give it a try–the results can be a delightful surprise!Diane Miller is a widely-exhibited freelance photographer who lives north of San Francisco, in Wine Country, and specializes in fine-art nature photography. Her work, which can be found on her web site, www.DianeDMiller.com, has been published and exhibited throughout the Pacific Northwest United States.. This is her first article for Adorama.


