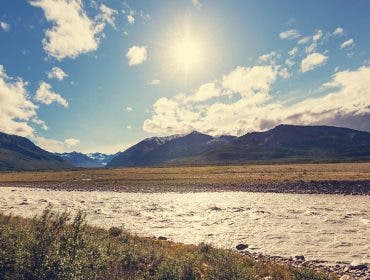
It won’t reduce reflections, but you can deepen blue skies–just like a polarizer does–in your favorite image editing program.
A glass polarizer filter is a very special tool. It has no substitute for reducing glare or reflections on glass and water. And many people don’t realize how much it can bring out the colors in a rainbow, or totally quench them, depending on how it is rotated. When I see a rainbow I reach for my polarizer before the camera.
But a polarizer’s effect to darken skies and bring out detail in clouds and other objects against the sky can be replicated with some success in the digital darkroom. There are times when using a polarizer is not practical, such as in a wide-angle shot that includes the sky. In this case the darkening of the sky would not be even. (And there are those of us who forgot to use one, once…) In such cases digital darkroom techniques can be valuable.
The figures below show a tree that was shot without (top) and then with a polarizer. The camera was positioned with the axis of the lens at 90 degrees to the sun so the polarizer would have maximum impact.
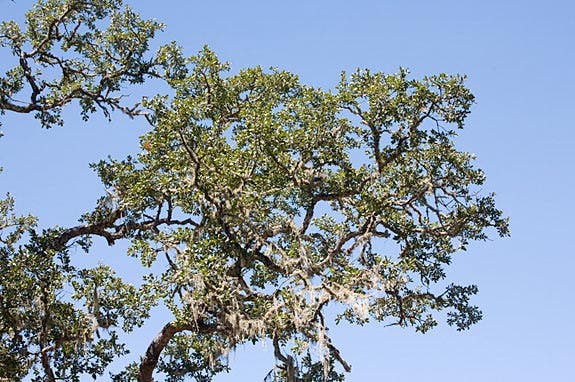
Without a polarizer

With a polarizer
Let’s start with the non-polarized image and see if we can make it as good as the polarized version. These images were made using Photoshop CS3, but almost any recent prior version will look the same. Photoshop CS4 has a slightly different look but easily translates from these figures.
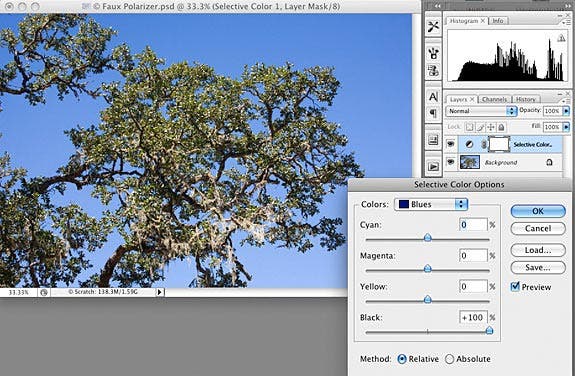
I made a Selective Color adjustment layer (Layer > New Adjustment Layer > Selective Color) and went to the Colors dropdown at the top of the dialog box and chose first Blues and then Cyans. For both I pulled the Black slider to the right, as shown in the figure below. This brings out a pleasing top-to-bottom gradient in the sky. In the image shot with the polarizer, the sky is darker on the right. Although the lens was set at 70mm, not exactly wide angle, the polarization of the sky varies enough with the angle from the sun that an uneven darkening was obtained across the angle of sky covered by the image.
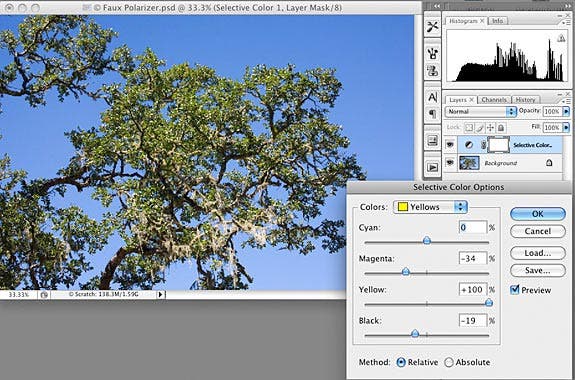
When a polarizer darkens the sky behind a tree, the sky remains at approximately the same exposure if it is a significant portion of the image, and the foliage therefore appears brighter. To lighten the greens in the tree I went back to the Color dropdown in he Selective Color dialog box and chose Yellows, because what we see as greens are often mostly yellows. I reduced magenta (which makes greens more dull), added yellow and pulled the Black slider left just a little to lighten the yellows, as shown below. You have to be careful not to reduce the black slider too much or you will loose contrast (and therefore saturation) in that color. Always zoom in to 100% and cruise around the image to see what you are really doing to it. It made a significant improvement in the leaves, adding pop and saturation.
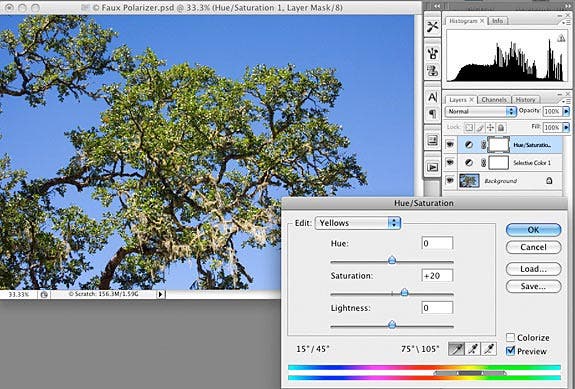
The leaves still lack some punch so I added a Hue and Saturation layer and added a little saturation to the yellows, as shown below.
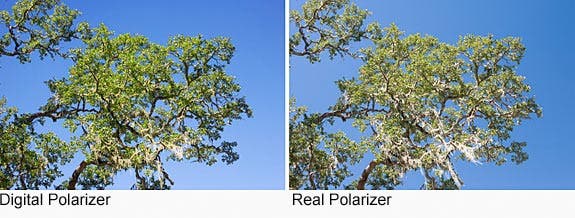
Now let’s look at a side-by-side comparison of the faux polarizer and the real one. I think the faux result is superior. With this technique I can go further than the effect achieved with a polarizer, and further than what I have shown here. If I had pushed the blues and cyans to the slider’s limit I could make the sky even darker by duplicating the Selective Color layer. In that case I might need to reduce the opacity of the new layer so it doesn’t go too far. I could also go back into the Hue and Saturation adjustment and increase the yellow saturation even more if needed. I could also tweak the hue of the sky and tree. The sky really is the limit here.
It’s better in RAW
 One drawback to using Selective Color to darken the sky is that any noise will be amplified. If the image was shot in raw, the same results can be achieved in Adobe Camera Raw, either in Photoshop or in Lightroom 2, and that is also the place to start with noise reduction.
In the Adobe Camera Raw window, below the histogram display, go to the fourth tab to the right, the HSL tab (Hue, Saturation and Luminance). Click the Luminance tab and drag the Blue slider to the left. Caution: it will be powerful if there is much blue in the sky to start with. If the color is not right, go to the Hue tab and adjust the Blue slider there. Back in the Luminance tab you can also lighten the Greens and Yellows in the leaves, as shown below.
If you are using Lightroom 2, click on HSL on the HSL / Color /Grayscale tab (right) to get equivalent adjustments. The color channels are different but you can easily find which ones work for your image.
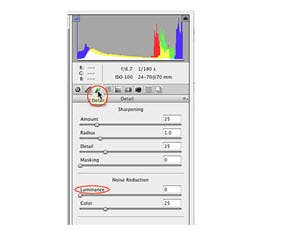
If this brings out noise in the sky, in Adobe Camera Raw click the tab to the left, Detail, shown below, and move the Luminance noise slider to the right. Going too far with this slider can soften detail, so zoom in to 100% to find the optimum point. (The Color noise slider won’t soften details.) I prefer to leave sharpening at its default settings, as shown, and only sharpen after resizing for print or other output.
 In Lightroom 2 the equivalent adjustments are found in the Detail tab.
Make the Clouds Pop
Another common use of a polarizer involves bringing out detail in clouds, and making them jump out from a darkened sky. I have found (to my surprise) that I can do almost as well with my digital polarizer, with some help from the Shadows-Highlights adjustment. Of course, I need to start with an exposure that is not blown out, so there is detail in the clouds to bring out. For those times you wish you had used a polarizer, this technique can make a dramatic difference.
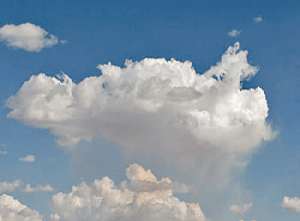
 The figure at right shows a cloud with somewhat weak detail that might have been helped by a polarizer.
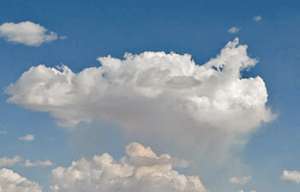
I darkened the sky as discussed above and then used the highlight adjustment in Image > Adjustments > Shadows-Highlights to bring more detail into the clouds.
Caution: If your Shadows/Highlights box shows only two sliders, one for Shadows and one for Highlights, check Show More Options at the bottom. You need the additional control this gives you. It is too much to go into the details of this very powerful and sophisticated adjustment here, but it is well worth learning to use it. It isn’t always a miracle, but it can be. To get you started, the default amounts are too high for most images. Try about 25 for each of the top six sliders and tweak from there. To work on clouds, just use the Highlights and pull the Shadows slider to zero.
 The image at right shows the results of a Shadows/Highlights adjustment. The gain in detail in the clouds goes beyond what a simple contrast increase can do. Every image is different; some may be improved even more dramatically, some less.
Also read: Do you still need a polarizing filter? Yes!
Diane Miller is a widely exhibited freelance photographer who lives north of San Francisco in the Wine Country and specializes in fine-art nature photography. Her work, which can be found on her web site, http://www.DianeDMiller.com, has been published and exhibited throughout the Pacific Northwest. Many of her images are represented for stock by Monsoon Images and Photolibrary.
