As much fun as it is to get to a new location and start shooting immediately, I’ve learned from experience (sometimes bitter experience!) that it’s best if you first pause for a few moments to organize your thoughts and your gear.
Ten minutes of preparation at the start of a day’s shooting can save you lots of frustration in the field–and perhaps help you create a few great photos along the way.
Over time you’ll create your own working method and a preference for certain camera settings, but when a camera is new to you or you’re uncertain of which settings to use, it’s worth starting each shooting trip with a quick survey of your camera’s controls.
Set the image quality
Always set your camera to the highest image-quality mode and the largest pixel dimensions. I recommend using the highest level of JPEG (with the least amount of compression), which on most cameras will be the Fine/Large setting. The JPEG format is fast, uses minimal memory space and produces superb image quality.


Don’t scrimp on pixels: I’m glad I set my camera for its finest resolution to capture this bridge just as it was bathed in golden late-day light. Always shoot with your camera’s finest setting; you never know when that once-in-a-lifetime shot will come along!


If you are comfortable using the RAW format to record images, then use your menu screen to set that mode. RAW images have some distinct advantages when it comes to image editing and processing, but remember that RAW files take up much more memory, both on memory cards and in the computer, are slower to record, and require special software to download.
Large-capacity memory cards have become extremely affordable, and you should always shoot the largest files your camera is capable of capturing, in whichever format you choose. How tragic it would be to get a once-in-a-lifetime shot and realize your camera is set to an inferior quality level!
Match exposure modes to your subject
The “auto” and “program” exposure modes are catch-all modes that are perfectly fine for general shooting situations. Most digital cameras, however, have a fistful of specialty subject modes, which enable you to match your camera settings to a particular subject. The most common subject modes include: landscape, action/sports, night photography, portraits, close-ups, etc.


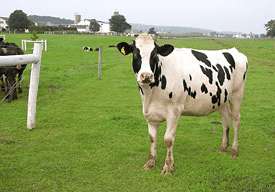
 Udderly perfect: A general setting like “Auto” or “Program” mode was good enough for me to capture this moo-ving bovine subject.

If you’re shooting high school sports, for example, switch to the “sports/action” mode to be sure you’re getting a fast enough shutter speed to stop action. Alternately, you can use the “shutter priority” mode to select a fast shutter speed yourself (or to intentionally set a slow shutter speed if you want to blur the motion).
Conversely, if you’re shooting landscapes and want a lot of depth of field (lots of near-to-far sharpness), choose the “landscape” subject mode so that the camera selects the smallest possible aperture (which is required for extensive depth of field). Or, if your camera allows, select the “aperture priority” mode and set a small aperture yourself.
White balance
Another thing that your camera can’t anticipate is the “color” of the light that you’re shooting in. While all light looks “white” to the naked eye, your digital camera will see different types of lighting as distinctly different colors.
Most digital cameras have an “auto” white balance setting that will automatically correct the color balance to compensate for the existing light–and in most situations that setting works just fine. You’ll find, however, that manually setting the white balance to a specific type of lighting produces far more accurate results.
Setting your own white balance is easy. Take a look at the light around you and match your white balance setting to that light. Cloudy day? Use the “cloudy day” or “shade” setting to warm up the scene. Shooting indoors with tungsten lamps? You’ll get much more appealing results if you set the “tungsten” setting.


Warm it up: Scene at left looks OK, but if you like warmer-looking landscapes, consider setting your white balance to cloudy day even on sunny days, as I did in the photo at right. The camera will add extra warmth that can be very appealing in both scenics and portraits.


Don’t carry too much gear
One of the most self-defeating things you can do is to try and carry too much gear with you–especially if you’re going to be doing a lot of walking. Let’s face it: If you’re walking the streets of Manhattan in search of great street photos, it’s unlikely you’re going to need your telephoto zoom lens or your flash unit. On the other hand, you don’t want to wander off without essential bits of equipment.
Last spring I was up in the Litchfield Hills in Connecticut, photographing a meadow filled with more than a million daffodils. I had to park the car some distance away and I arrived at the location just as the late-afternoon light was igniting the sea of blossoms. The minute I started to shoot, I realized that my fresh batteries were still in the car–nearly a quarter mile away–and the battery in my camera was nearly dead. What a waste of beautiful light!
I almost never carry a shoulder bag in the field with me (though I do travel with one), but I wear a photographer’s vest almost every time I go shooting–and I strongly suggest that you consider buying one. As goofy as you might look strolling around with a bulging canvas vest, once you get in the habit of packing everything you need into the vest pockets, you’ll be wearing everything you need.


