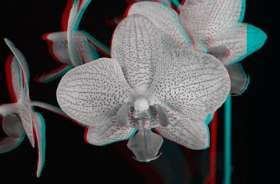
Remember reading comic books or going to the movies and donning those odd-looking cardboard eyeglasses with translucent red over one eye and cyan over the other so you could see the images in eye-popping stereo? You can create Anaglyph 3-D photos digitally!
|
Anaglyphs–those stereo images that look out of alignment to the naked eye but are transformed into lifelike, three-dimensional images by cyan-and-red glasses–are an old-time stereographic technique that has been given new life, thanks to digital imaging. There are times that even the best lighting and composition just can’t express the true depth of a scene or the shape of an unfamiliar object. For these occasions, or even if you just want to make a lasting, unique impression, shooting the scene for stereo reproduction may be the enhancement you need…and it’s easy to make anaglyphs with a single digital camera. Anaglyphs were first proposed in the mid 19th century. Overshadowed by the very popular direct-viewing hand-held stereographs of the late 19th century, the use of anaglyphs enjoyed a resurgence in the 1950s both in the movies and in the emerging comic books of the post-war (WWII) period. Also read “Wiggle 3D: How To Make Animated 3D Images” Today, anaglyphs are used for viewing everything from dinosaurs to engineering prototypes and even the navigational and geological data from the fabulous Mars Rovers (820-plus days and still going as of this writing). They are also the least expensive type to print…especially in large sizes. Best of all, you can print them on a standard inkjet printer. The only drawback is that the stereo images as viewed are grayscale. But the sense of depth and presence they provide generally overshadows this limitation. In other words, 3D is not for kids any more. Make a 3D image with your digicam! You don’t need special equipment to create a 3D anaglyph image–all you need’s a single digital camera, and any image editing software. Let’s make one now.
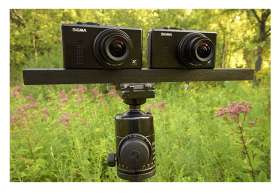
To begin we need two images, one for each of our eyes, taken slightly apart to replicate the separation between our eyes–stereo vision! For subjects from five feet to 25 feet away, a separation of two to three inches (50-75mm) between frames is sufficient for good depth perception in the final image. It is important that the camera movement between shots be parallel. Do not turn the camera; otherwise the view angle from each position will be cross-eyed and the stereo reversed behind the subject. There are a few methods for moving the camera horizontally (as perfectly as possible) to preserve optically accurate stereo. For subjects ranging from stereo macro to about 40 feet away, I have found the geared camera platform of inexpensive macro-rail units Once you’ve captured your images, it’s time to open them in your image editing software. Transforming two images into one 3D I am assuming a fair to moderate familiarity with Photoshop (any full version since 5.0 should work) on the part of the reader in giving these directions. Now that we have the two images we need, they should be sharpened as usual and any major disparity between them in exposure should be adjusted out. Then, convert them to grayscale. At this point I usually save both images as TIFF files for later use. The grayscale image that is the left-eye view becomes the “base” image. 1) Select the entire LEFT image and copy it. 2) Convert the file to RGB
3) PASTE the copy of the left image into ONLY the RED channel 4) Select the entire grayscale RIGHT image and copy it.
5) PASTE the right image copy into the GREEN channel
6) PASTE the right image copy into the BLUE channel (Yes-do the green and blue channels individually) 7) SAVE the file as ABCD 3D v100.tif or what ever you like as a name. This is the base 3D image (hence the v100 designation)
8) Select only the Green and the Blue channels. Using the MOVE tool (V key in Photoshop), move the BOTH blue+green channels vertically until the image details line up horizontally with the corresponding Red channel data. Pulling a guide from the top of the image window can help in judging the true image horizon. Vertical misalignment of the left vs. right images (see sample, above) is the main reason for eyestrain while viewing stereo images.
9) Now select the Red channel only. By sliding the red channel sideways using the cursor keys (to preserve the vertical alignment of the horizontal details) you can adjust the point of convergence of the scene…typically this is the main subject or the mid-field plane of a landscape-scenery image. This can also “move” the image literally in and out of the plane of the screen or print. 10) Put on 3D glasses and check your handiwork. If you’re happy save the file as ABCD 3D Final.tif so you know it’s the aligned final version. Get the glasses There are many places to obtain 3D glasses on the Internet, like this one. (They’ll even send you a free pair of 3D glasses if you send them a SASE.) Or, just type “3D glasses” in any search engine. In lieu of the glasses, if you have a 25A (red) filter and an 80A (blue), you can use those as a substitute (the single 80A may not be strong enough but the stereo will work). Or, find a child who has a pair of 3D glasses. For a small bribe (a free 3D print, for example) he or she may be happy to lend or give you theirs. Some people have pronounced right eye dominance and switching from red left/blue-green right to blue-green left/red right may help them see the image better. The procedure is the same…just reverse the eye-camera colors. Just for fun…here’s a Quicktime Video demonstrating the whole process! (High-speed Internet connection strongly recommended.) to be especially useful. For really big things, like a mountain range miles away, you may have to move the camera as much as 100 or more feet.
|
|||||||
Digital imaging specialist Peter Lipschutz’s background includes photography and television production experience dating back to the Nixon administration, but his long-time passion is Astronomy. An amateur astronomer and astrophotographer since 1975, Peter participated in the International Halley Watch in 1986. Peter has been a part-time instructor for the Hayden Planetarium in New York since 1995, and recently the native New Yorker became a Hayden Associate. Peter has been working for Adorama Camera since 1990.
Updated 8/20/09


